Since we set up a Kubernetes Raspberry Pi cluster with K3S, now what can we do with it ? In this blog we configured a cluster with 1 master and two nodes, and when I write in the tittle i should have add “for n00bs” somewhere, because I’m a total noob when it’s about Kubernetes topic and I’m learning (and share) every time I have the opportunity, i’m also a total noob with all the crypto currency thingy even If i do have a clear understand of the principles.
I think this is an interesting technology to understand and use cases are beginning to surface in my mind. Like all the technology / software we know, this won’t solve all the problem we are trying to resolve every day but it’s a tool more in our basket to find the best solution when necessary.
So i’ve been curious and I tried, i failed a lot but in the end I succeeded to learn and achieve what I was trying to do. Kubernetes is one thing, but now we need to move forward and use it to deploy apps / instances, and another thing i’ve been curious about is crypto currency (Bitcoin, Dogecoin etc…) and I did the same I did with Kubernetes, I read a lot and I learned a lot. I won’t expose here what is cryptocurrency and blockchain how it’s suppose to make the world a better place without the control of banks and states over our money, but it’s very interesting and the way people and companies try to get the most of it for personal gain and how big companies and banks are mining with so many computer that the blockchain is centralised again..
![]()
So why and how can we use Kubernetes to mine crypto currency with Raspberry Pis ?
The answer to why is for educational purpose because the computing power of a Raspberry Pi is nothing compare to a single graphic card used for mining but still we can do it and help solving some blockchain calculation.
With Kubernetes we can chose in a yml file how many nodes we want to deploy and the resources limitation if any to allow for each instance. we can also add of remove nodes as much as we want to increase or decrease the power used to mine crypto currency.
I could have chosen WordPress of another blog engine to show you how Kubernetes is working but using crypto currency make it a bit more exiting and more fun 🙂
We have a running Raspberry Pi (3) Kubernetes Cluster

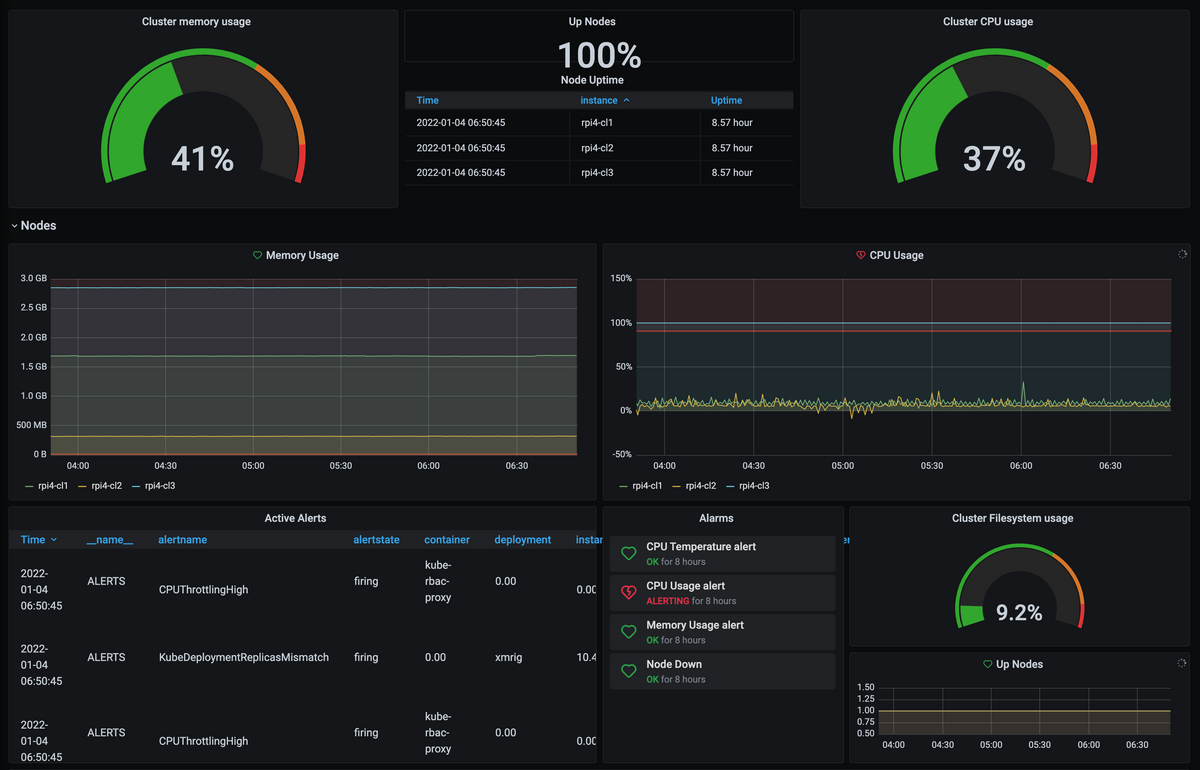
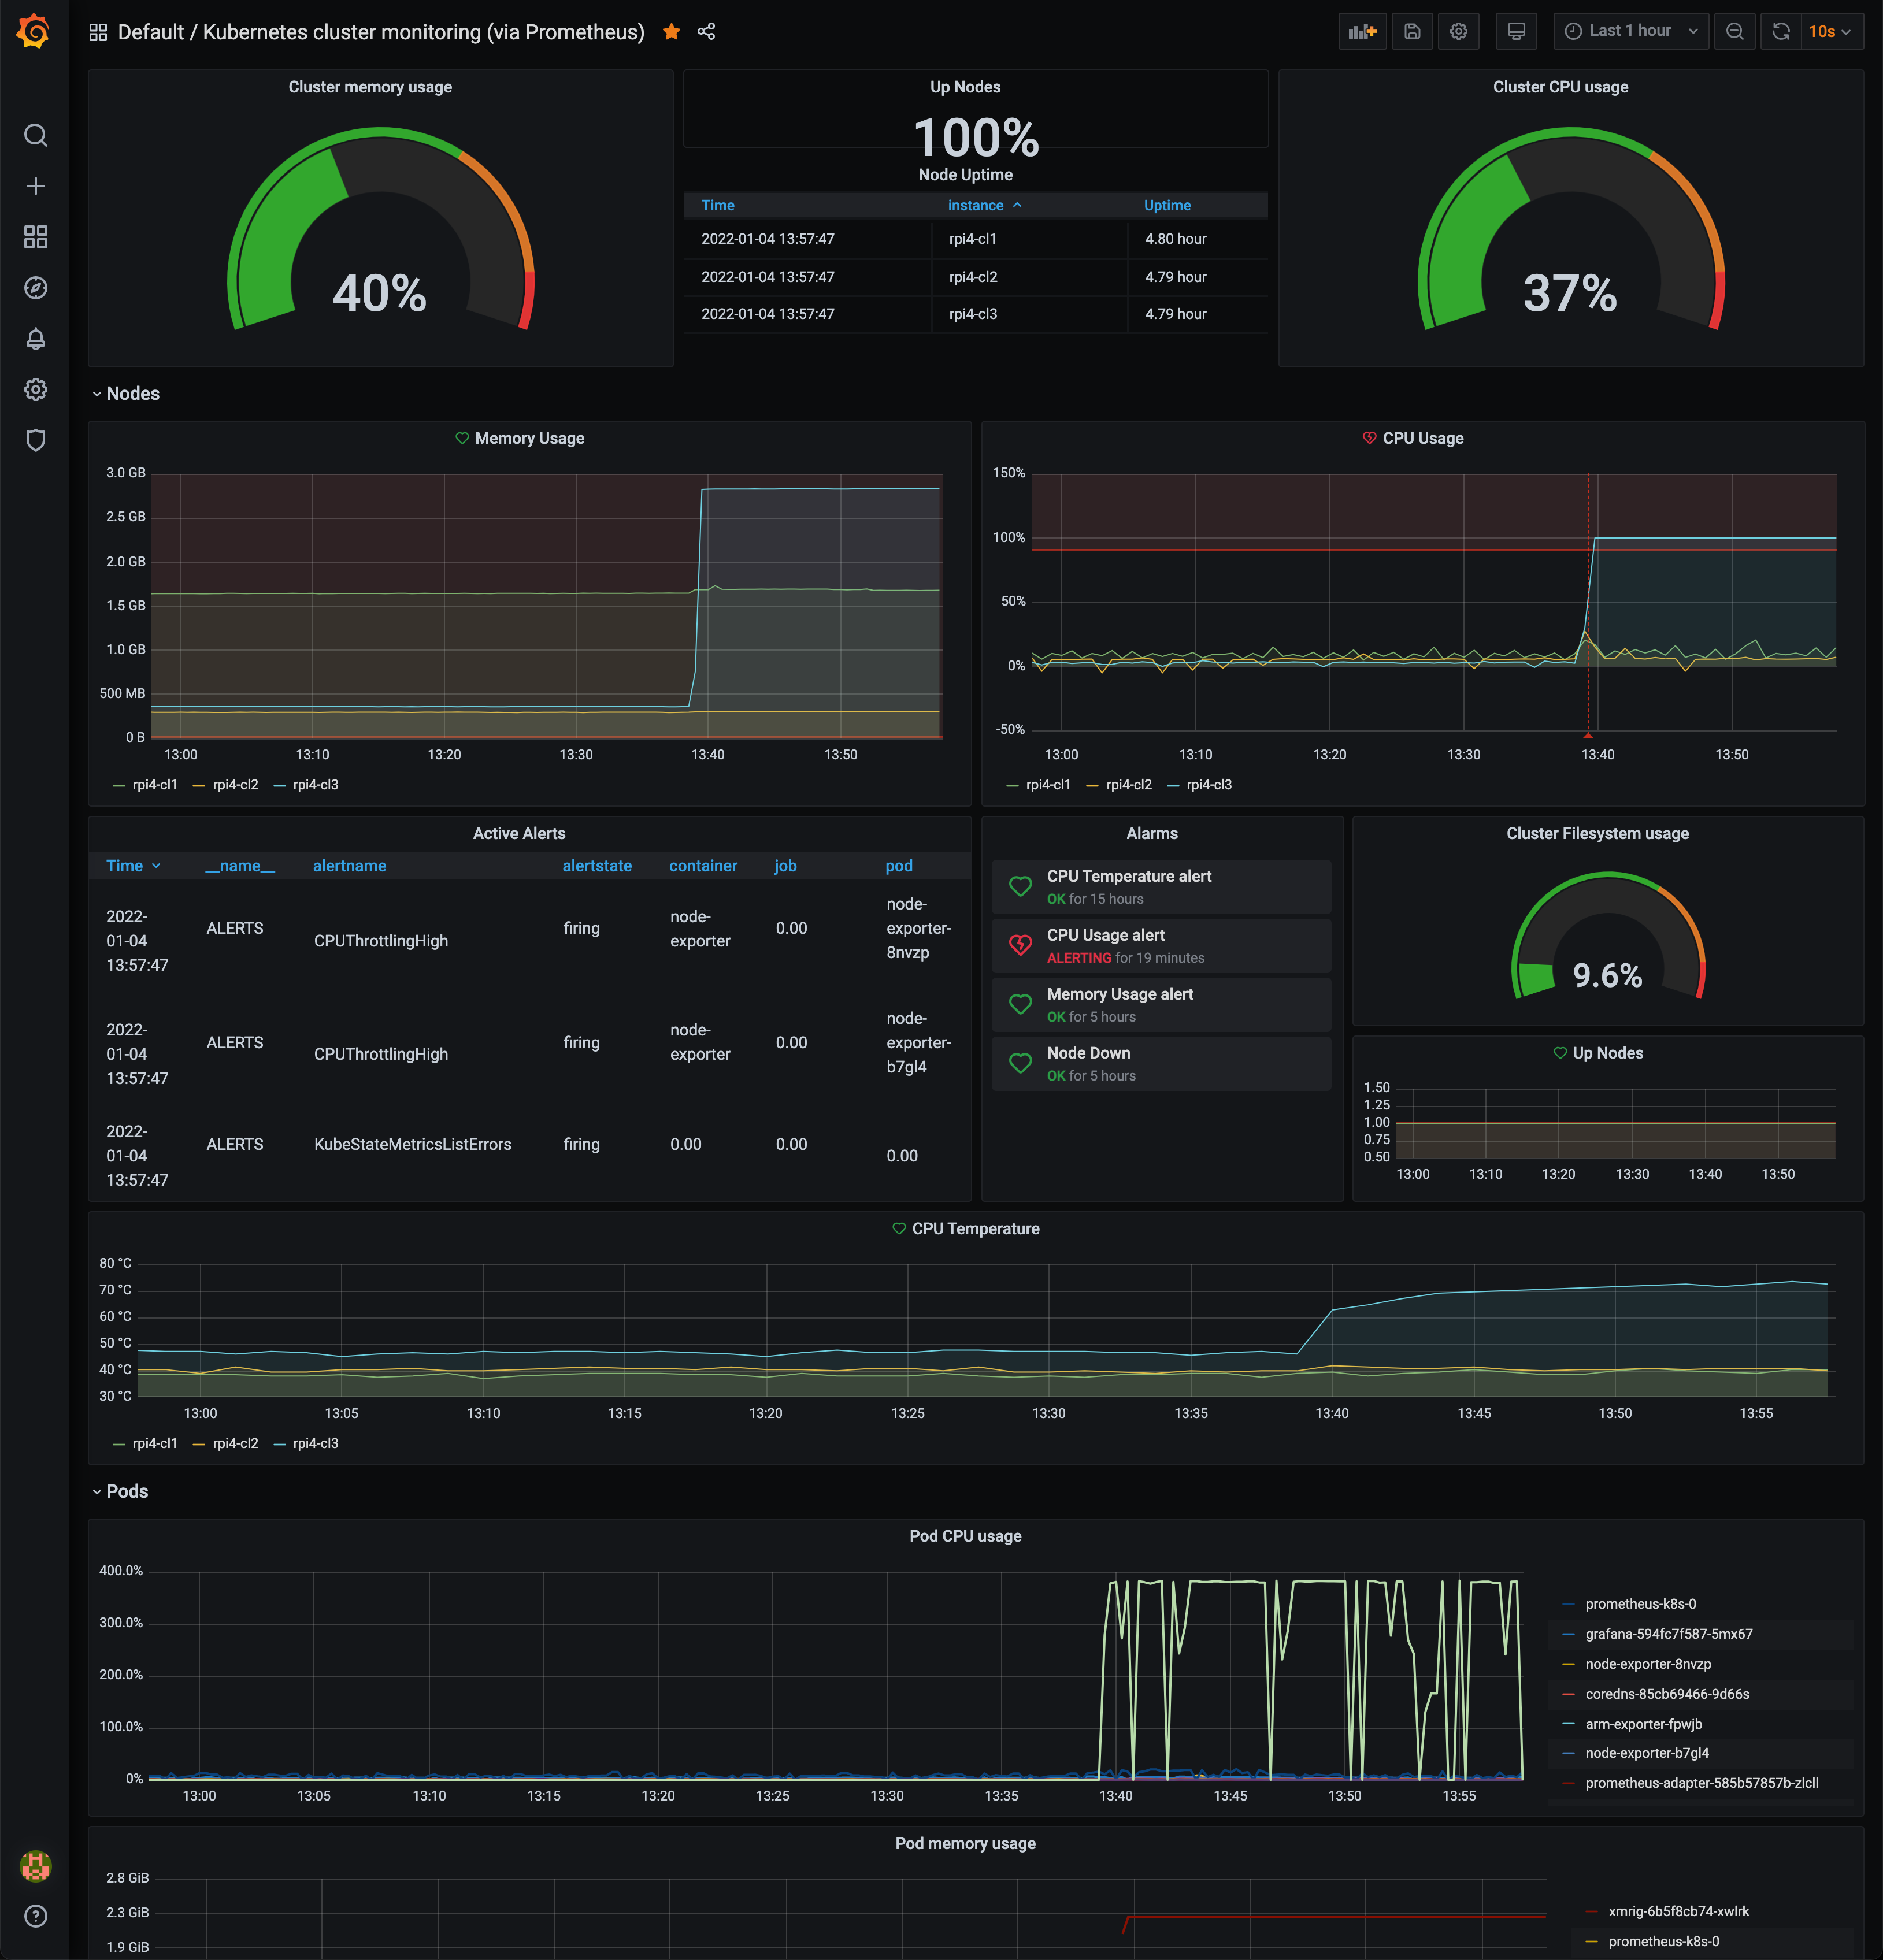
I’ve already deploy Grafana and Prometheus to monitor this cluster
Overview of the cluster :
That’s a pretty neat dashboard you can find the github page project here : https://github.com/carlosedp/cluster-monitoring
We will be able to see what’s going on the Kubernetes Raspberry Pi cluster
So we will deploy a crypto miner software meant to work on Raspberry Pis to mine Monero crypto Currency ( link ) I chose this crypto currency because this is one still “affordable” to mine as it is today.
B”fore everything we need to create a wallet, a wallet et here to store the money you will earn by mining and this give you a wallet address we will need to mine. You can download and create your own account on Monero’s website by downloading their wallet application : https://www.getmonero.org/downloads/
Once you’ve installed and created your account, you have a wallet number

For example my wallet number is : 422rMoT8Yq6KcykC7nrnjEAj3obRRgJaa1BqGmqUvYtqjKqA39fWu5LURrNwhWhCqFafafyDtAP5J8zFk38oi5Re4w9vDGS
Easy to remember 🙂
Then we need to find a mining pool, because us alone with fe Raspberry Pi won’t be able to have enough computing resources to be able to ‘participate’ to the effort. There is a list of all the pool for Monero here : Monero (XMR) RandomX | Mining Pools (miningpoolstats.stream) and I choose to participate to the first pool of the list : minexmr.com on their website, the address we must use is pool.minexmr.com or fr.minexmr.com.
Port available are 4444 standard port or 443 TLS port
So we do have everything to begging to mine and become the richest dude on earth !
- Wallet address
- Pool and port address
- Miner (Raspberry Pis)
The last piece of this equation is the Kubernetes application we will need to push to begin the process. I found a Github with everything already ready to go (almost) GitHub – rcmelendez/xmrig-docker: Monero
We need to clone this git by running :


sudo git clone https://github.com/rcmelendez/xmrig-docker.git
Then we need to edit the config.json file inside the xmrig-docker directory
sudo nano xmrig-docker/config.json
and then place the values we gathered along this blog : Wallet address, pool and port address, the values I changes are bold and in red
{
    "api": {
        "id": null,
        "worker-id": null
    },
    "http": {
        "enabled": false,
        "host": "127.0.0.1",
        "port": 0,
        "access-token": null,
        "restricted": true
    },
    "autosave": false,
    "background": false,
    "colors": true,
    "title": true,
    "randomx": {
        "init": -1,
        "init-avx2": -1,
        "mode": "auto",
        "1gb-pages": true,
        "rdmsr": true,
        "wrmsr": true,
        "cache_qos": false,
        "numa": true,
        "scratchpad_prefetch_mode": 1
    },
    "cpu": {
        "enabled": true,
        "huge-pages": true,
        "huge-pages-jit": false,
        "hw-aes": null,
        "priority": null,
        "memory-pool": false,
        "yield": true,
        "max-threads-hint": 100,
        "asm": true,
        "argon2-impl": null,
        "astrobwt-max-size": 550,
        "astrobwt-avx2": false,
        "cn/0": false,
        "cn-lite/0": false
    },
    "opencl": {
        "enabled": false,
        "cache": true,
        "loader": null,
        "platform": "AMD",
        "adl": true,
        "cn/0": false,
        "cn-lite/0": false
    },
    "cuda": {
        "enabled": false,
        "loader": null,
        "nvml": true,
        "cn/0": false,
        "cn-lite/0": false
    },
    "donate-level": 0,
    "donate-over-proxy": 0,
    "log-file": "/xmrig/log/xmrig.log",
    "pools": [
        {
            "algo": null,
            "coin": "XMR",
            "url": "fr.minexmr.com:443",
            "user": "422rMoT8Yq6KcykC7nrnjEAj3obRRgJaa1BqGmqUvYtqjKqA39fWu5LURrNwhWhCqFafafyDtAP5J8zFk38oi5Re4w9vDGS",
            "pass": "github",
            "rig-id": null,
            "nicehash": false,
            "keepalive": true,
            "enabled": true,
            "tls": true,
            "tls-fingerprint": null,
            "daemon": false,
            "socks5": null,
            "self-select": null,
            "submit-to-origin": false
        }
    ],
    "print-time": 60,
    "health-print-time": 60,
    "dmi": true,
    "retries": 5,
    "retry-pause": 5,
    "syslog": true,
    "tls": {
        "enabled": false,
        "protocols": null,
        "cert": null,
        "cert_key": null,
        "ciphers": null,
        "ciphersuites": null,
        "dhparam": null
    },
    "user-agent": null,
    "verbose": 0,
    "watch": true,
    "pause-on-battery": false,
    "pause-on-active": false
}
Save the file and close it, now we need to create a Namespace, this is a place for the application we are deploying to run :
kubectl create ns xmrig
We now need to create the configmap xmrig from the config.json file :
kubectl create configmap xmrig-config --from-file config.json -n xmrig
now we can edit the file xmrig.yaml to adapt it if needed
replicas: number of desired pods to be running.image:tag: to view all available versions, go to the Tags tab of the Docker Hub repo.resources: set appropriate values forcpuandmemoryrequests/limits.affinity: the manifest will schedule only one pod per node, if that’s not the desired behavior, remove theaffinityblock.
in bold and red what i changed
apiVersion: apps/v1
kind: Deployment
metadata:
  labels:
    app: xmrig
  name: xmrig
  namespace: xmrig
spec:
  replicas: 2
  selector:
    matchLabels:
      app: xmrig
  strategy: {}
  template:
    metadata:
      labels:
        app: xmrig
    spec:
      affinity:
        podAntiAffinity:
          requiredDuringSchedulingIgnoredDuringExecution:
          - labelSelector:
              matchExpressions:
              - key: app
                operator: In
                values:
                - xmrig
            topologyKey: "kubernetes.io/hostname"
      containers:
      - image: rcmelendez/xmrig:6.16.2
        name: xmrig
        command: ["xmrig"]
        args: ["-c", "/xmrig/etc/config.json"]
        resources:
          limits:
            memory: "4Gi"
            cpu: "4"
          requests:
            memory: "2Gi"
            cpu: "2"
        volumeMounts:
        - name: config-volume
          mountPath: /xmrig/etc
      volumes:
      - name: config-volume
        configMap:
          name: xmrig-config
I changed to 2 nodes the deployment so I can keep the 3rd and last Pi to use for something else. Now we can create the deployment :
kubectl apply -f xmrig-docker/xmrig.yamlthe return should be : deployment.apps/xmrig created
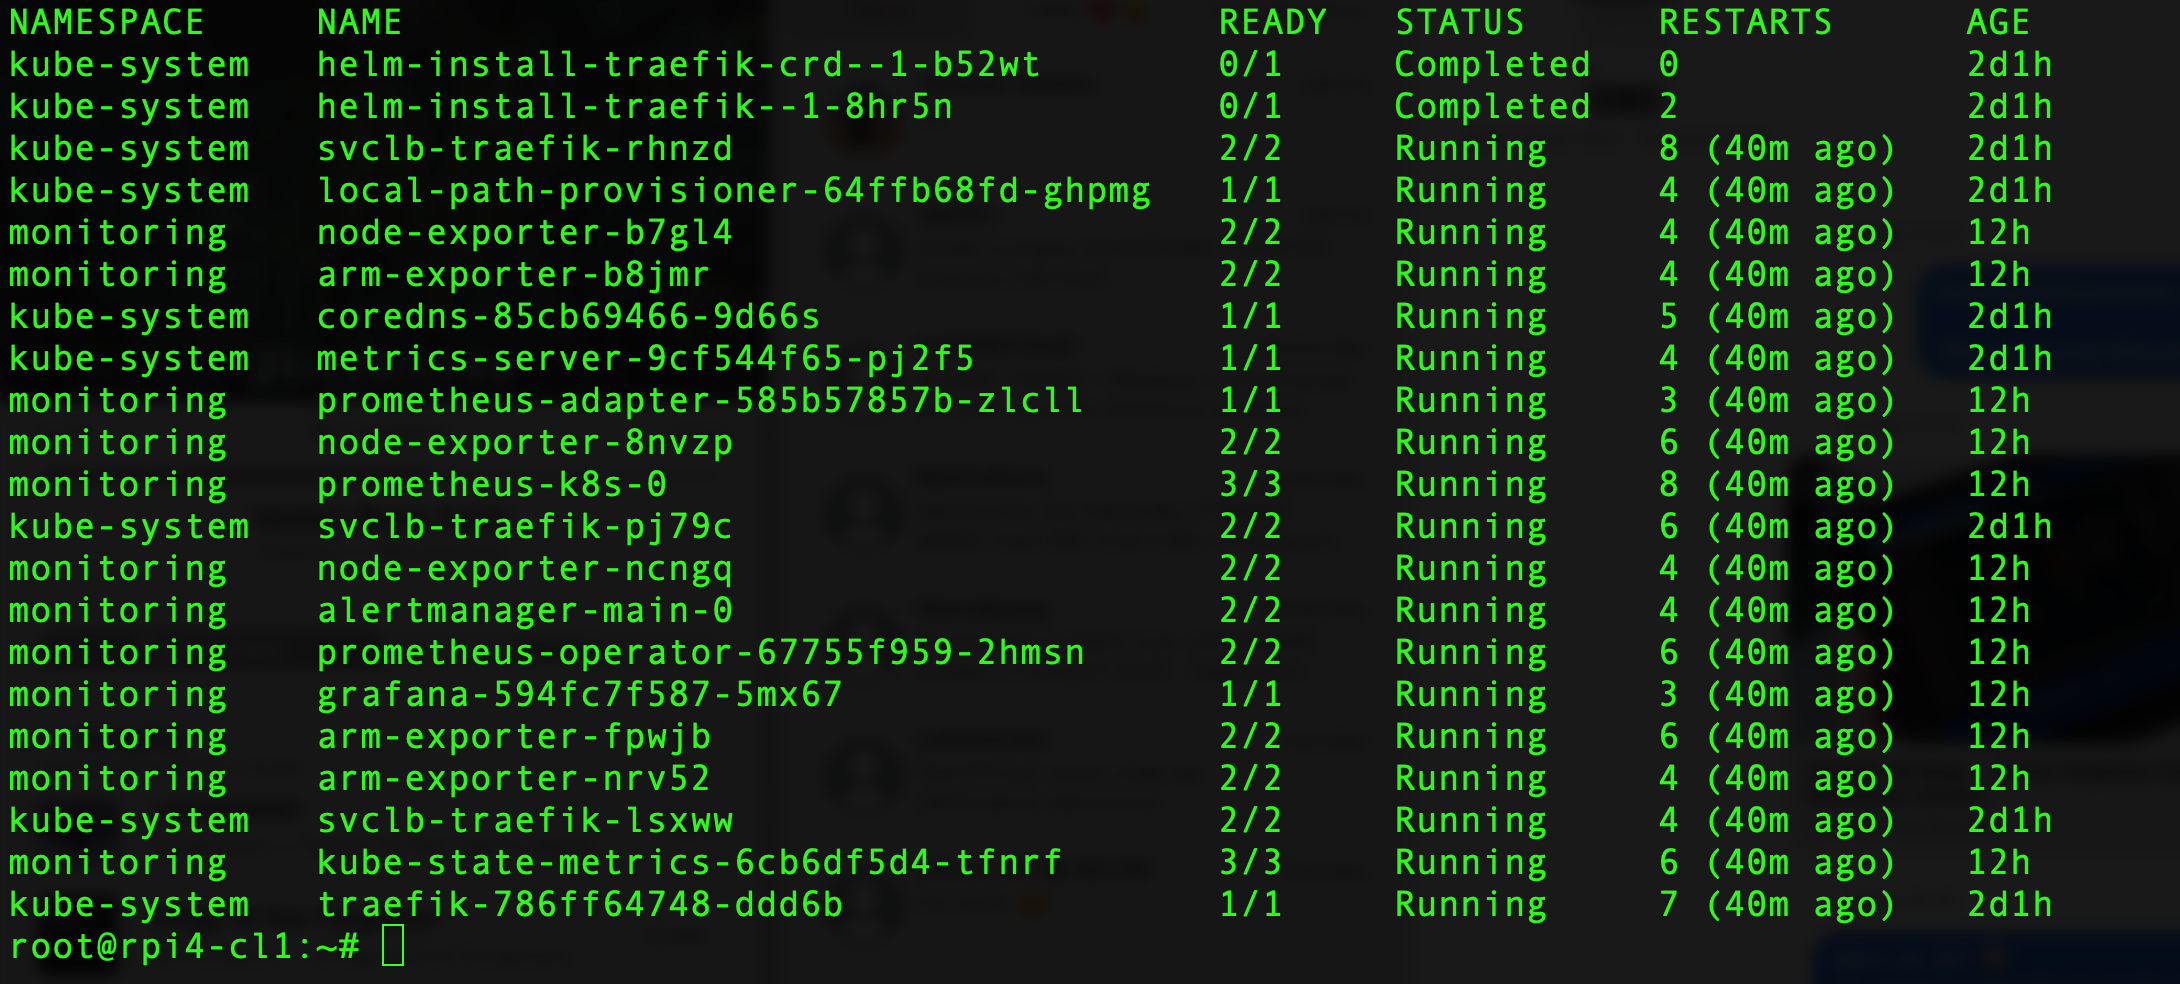
then if you want to check what’s going on you can use this command line to list all the pods
kubectl get pods --all-namespaces -o wide
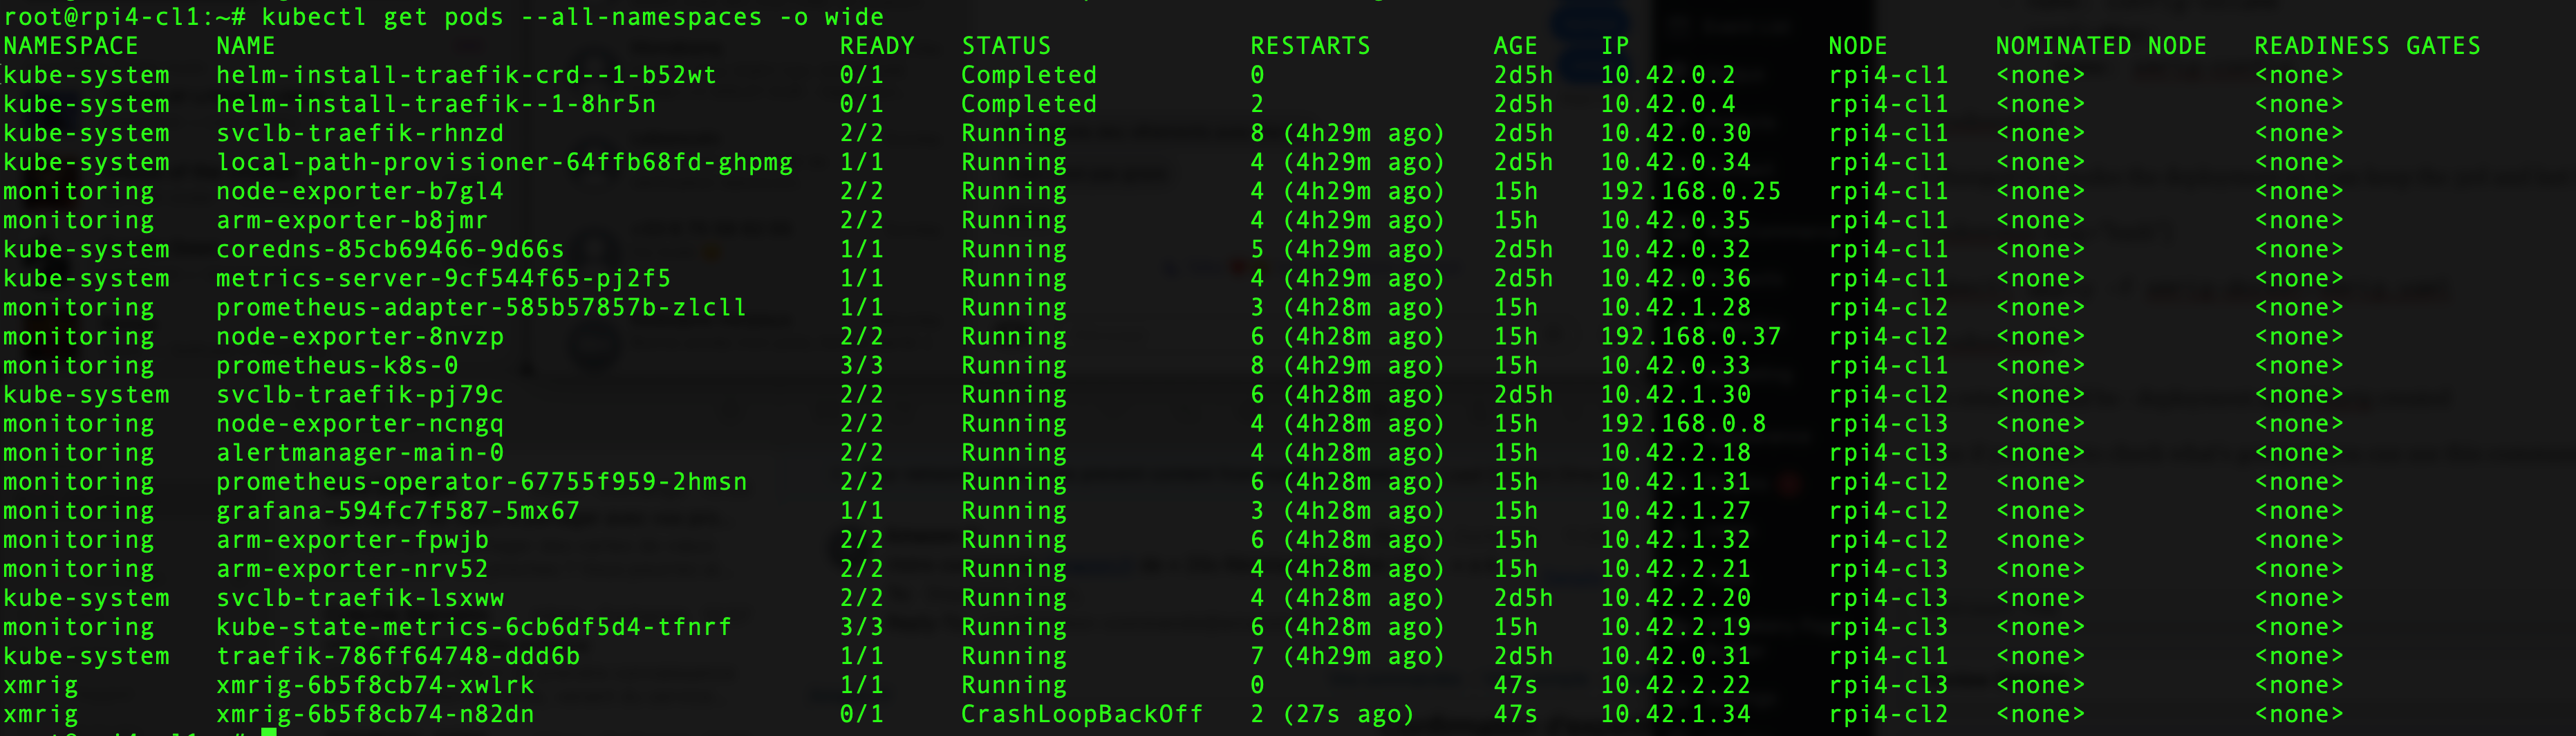
We can see the two deployment have been done and 1 is successful but the second one is in error, probably because Prometheus and Grafana are running on this Raspberry Pi (rpi4-cl2) and there is not enough resources available. We can read the status CrashLoopBackOff
If i wanted to add 4 Raspberry to this cluster, I could simply change the value in xmrig.yaml file to increase the number of nodes allocated to this deployment and then initiate the deployment again. (I will definitely do this when I get more Raspberry Pis around)
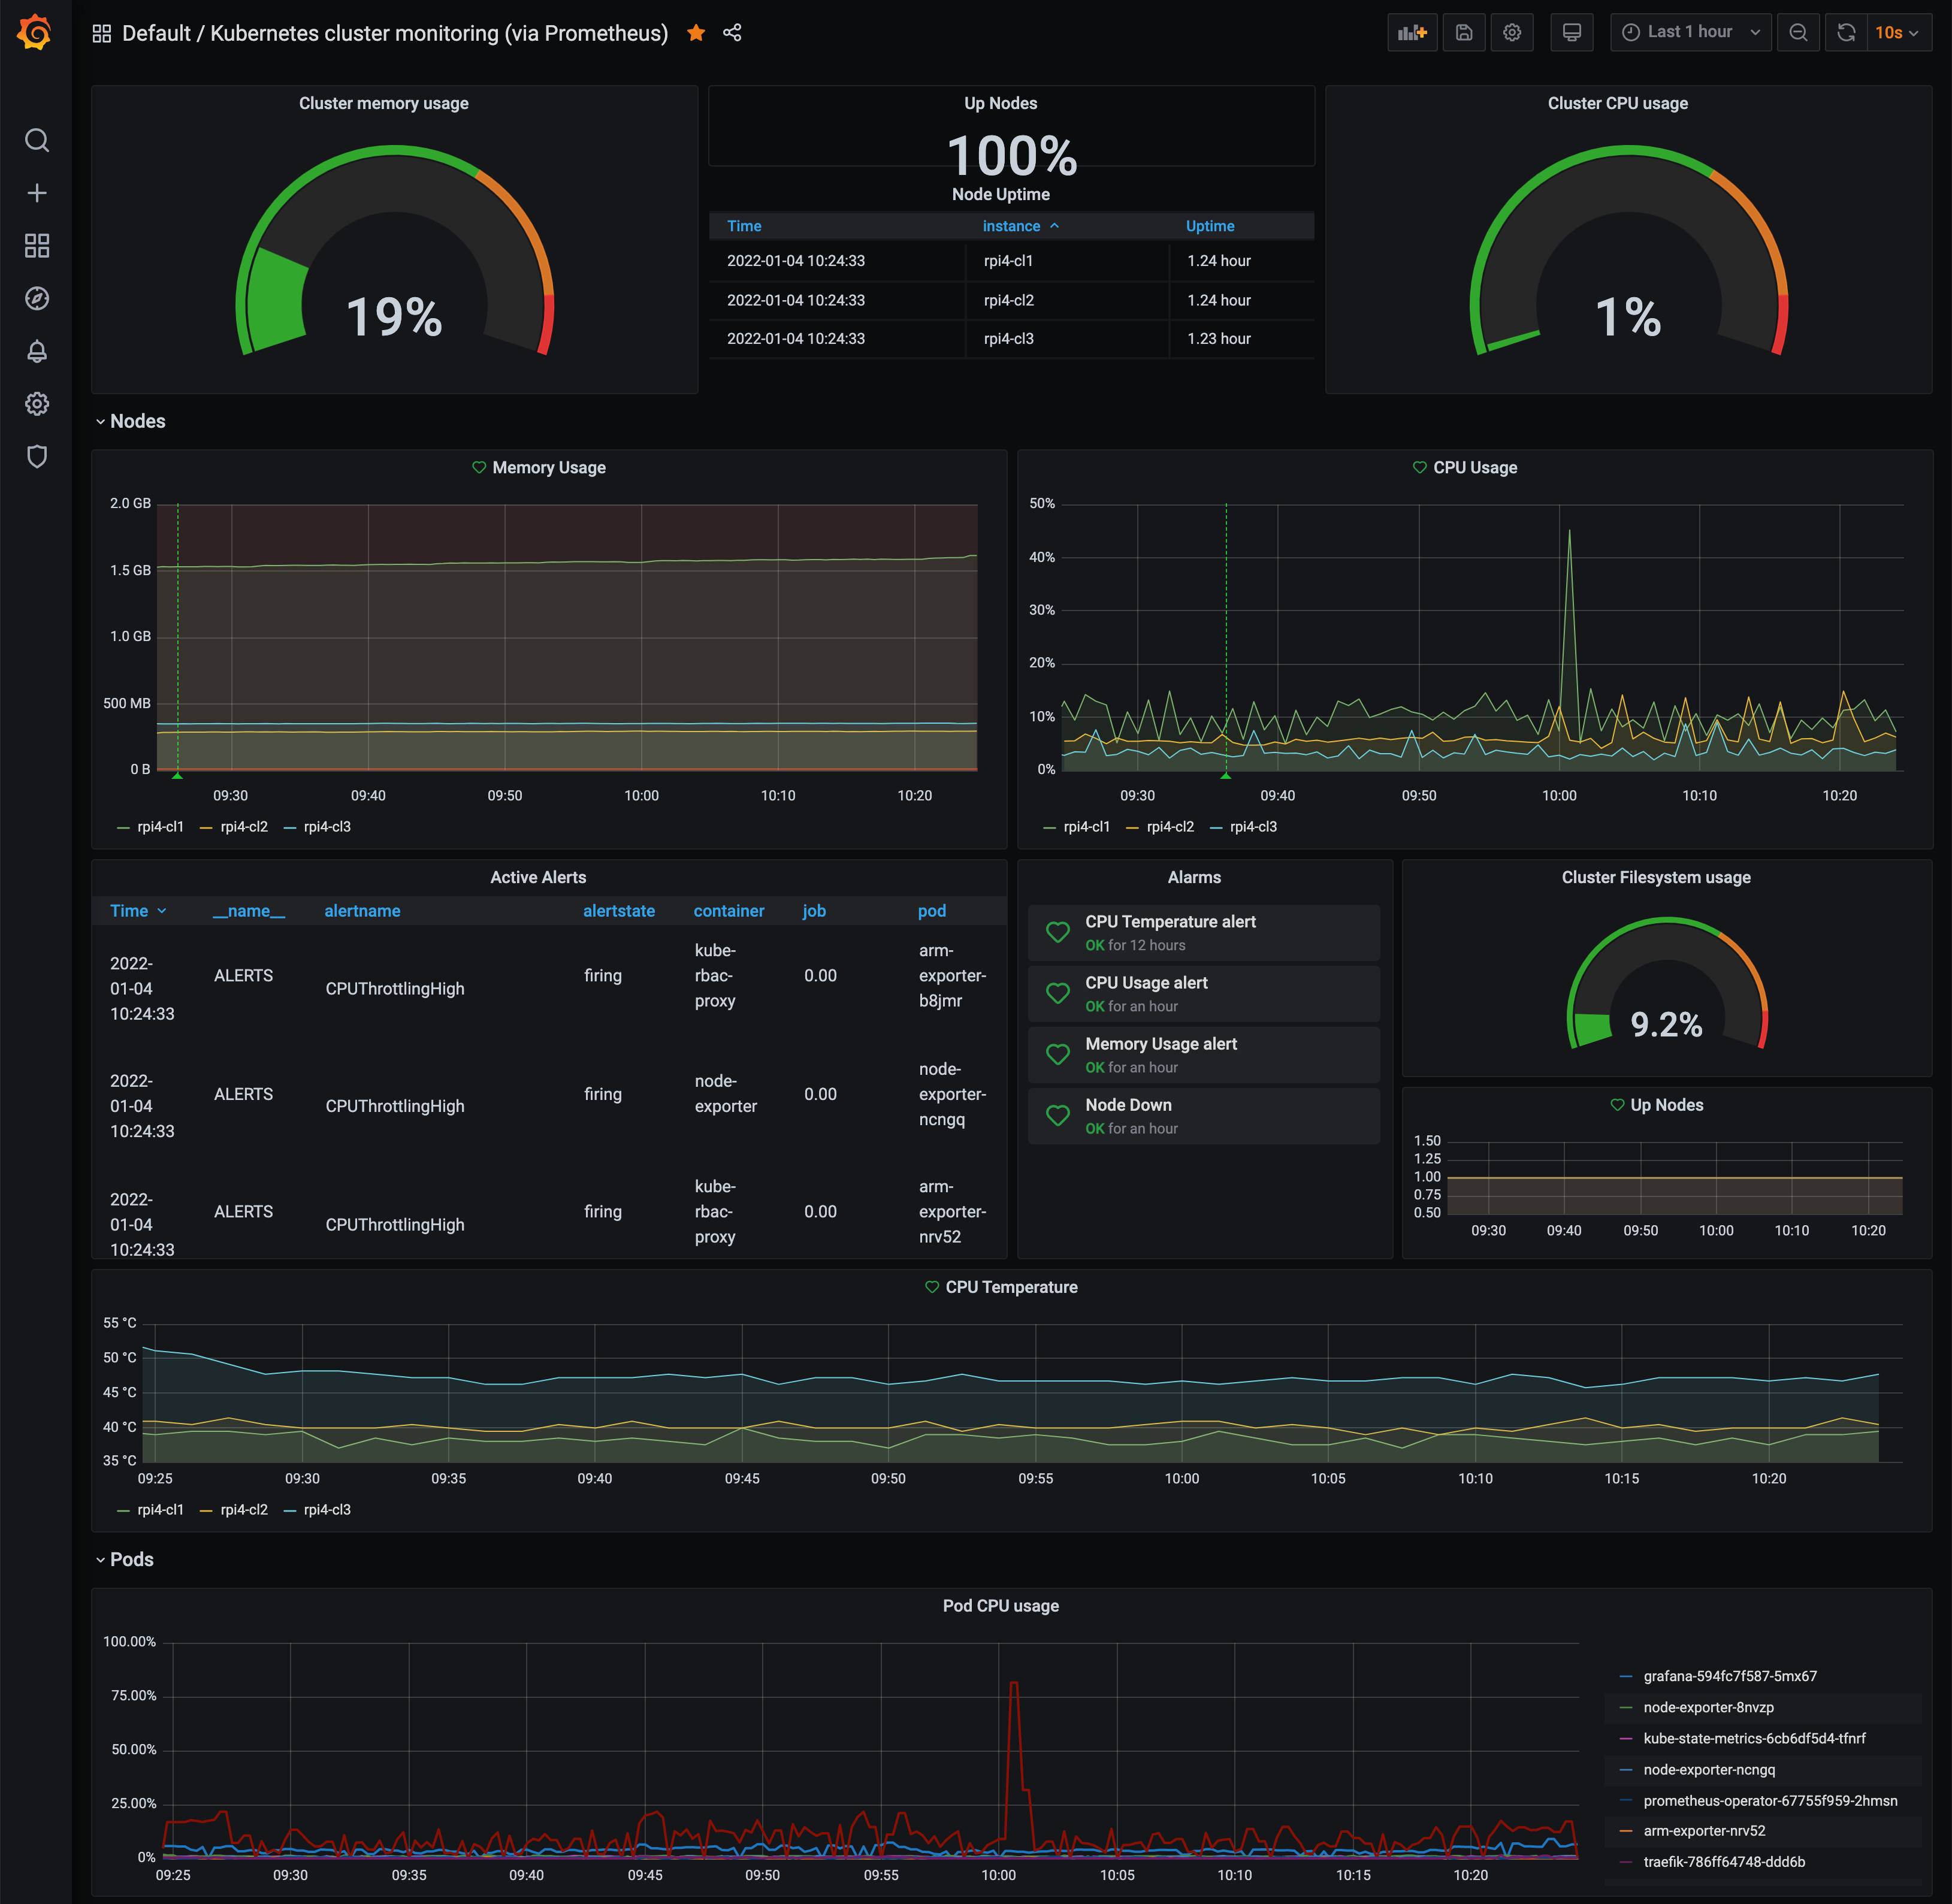
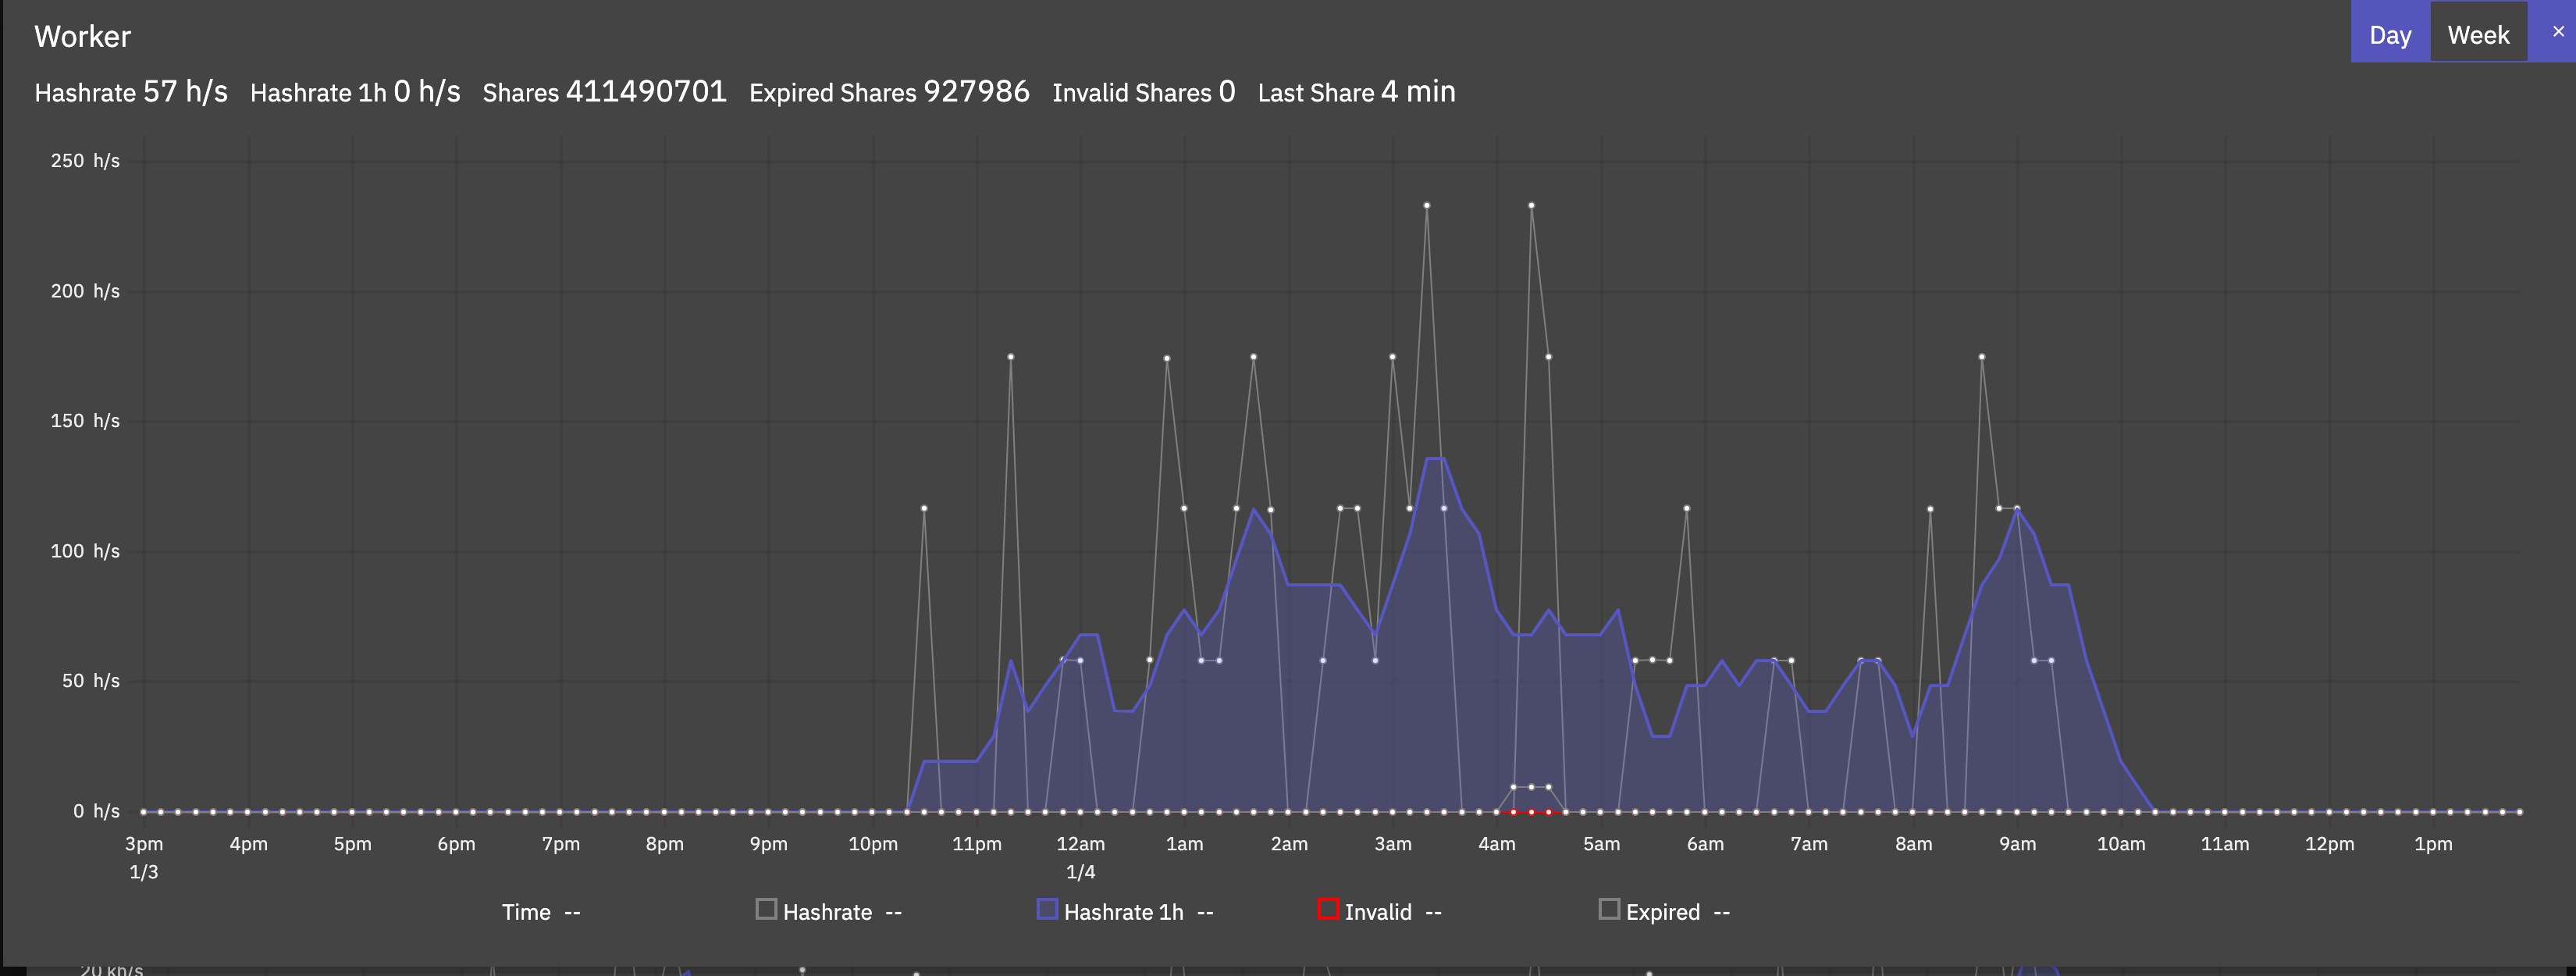
So here we are, the hash rate of a Raspberry Pi is not something that will make me rich but it’s fun to do an accomplish
We can see with Grafana something going on with CPU and the whole cluster. As expected, the mining software is using all the cpu possible on the working Raspberry Pi
So the next blog will be about why the deployment on the second node didn’t work as intended and how I will troubleshot it, first I need to learn ^^