Stéphane Thirion
  • Home
  • Consulting – Raidho
  • homelab
3K
0
0
0
Stéphane Thirion
Stéphane Thirion
  • Home
  • Consulting – Raidho
  • homelab
  • Cloud
  • Docker
  • Kubernetes
  • Raspberry

Kubernetes cluster with Raspberry Pi(s)

  • December 28, 2021
  • Stephane Thirion
Total
21
Shares
0
0
21
0
0
0
0

There are plenty of websites where Kubernetes is explained, why how etc, if you want to know more or if you’re just curious I suggest you head over there : Kubernetes

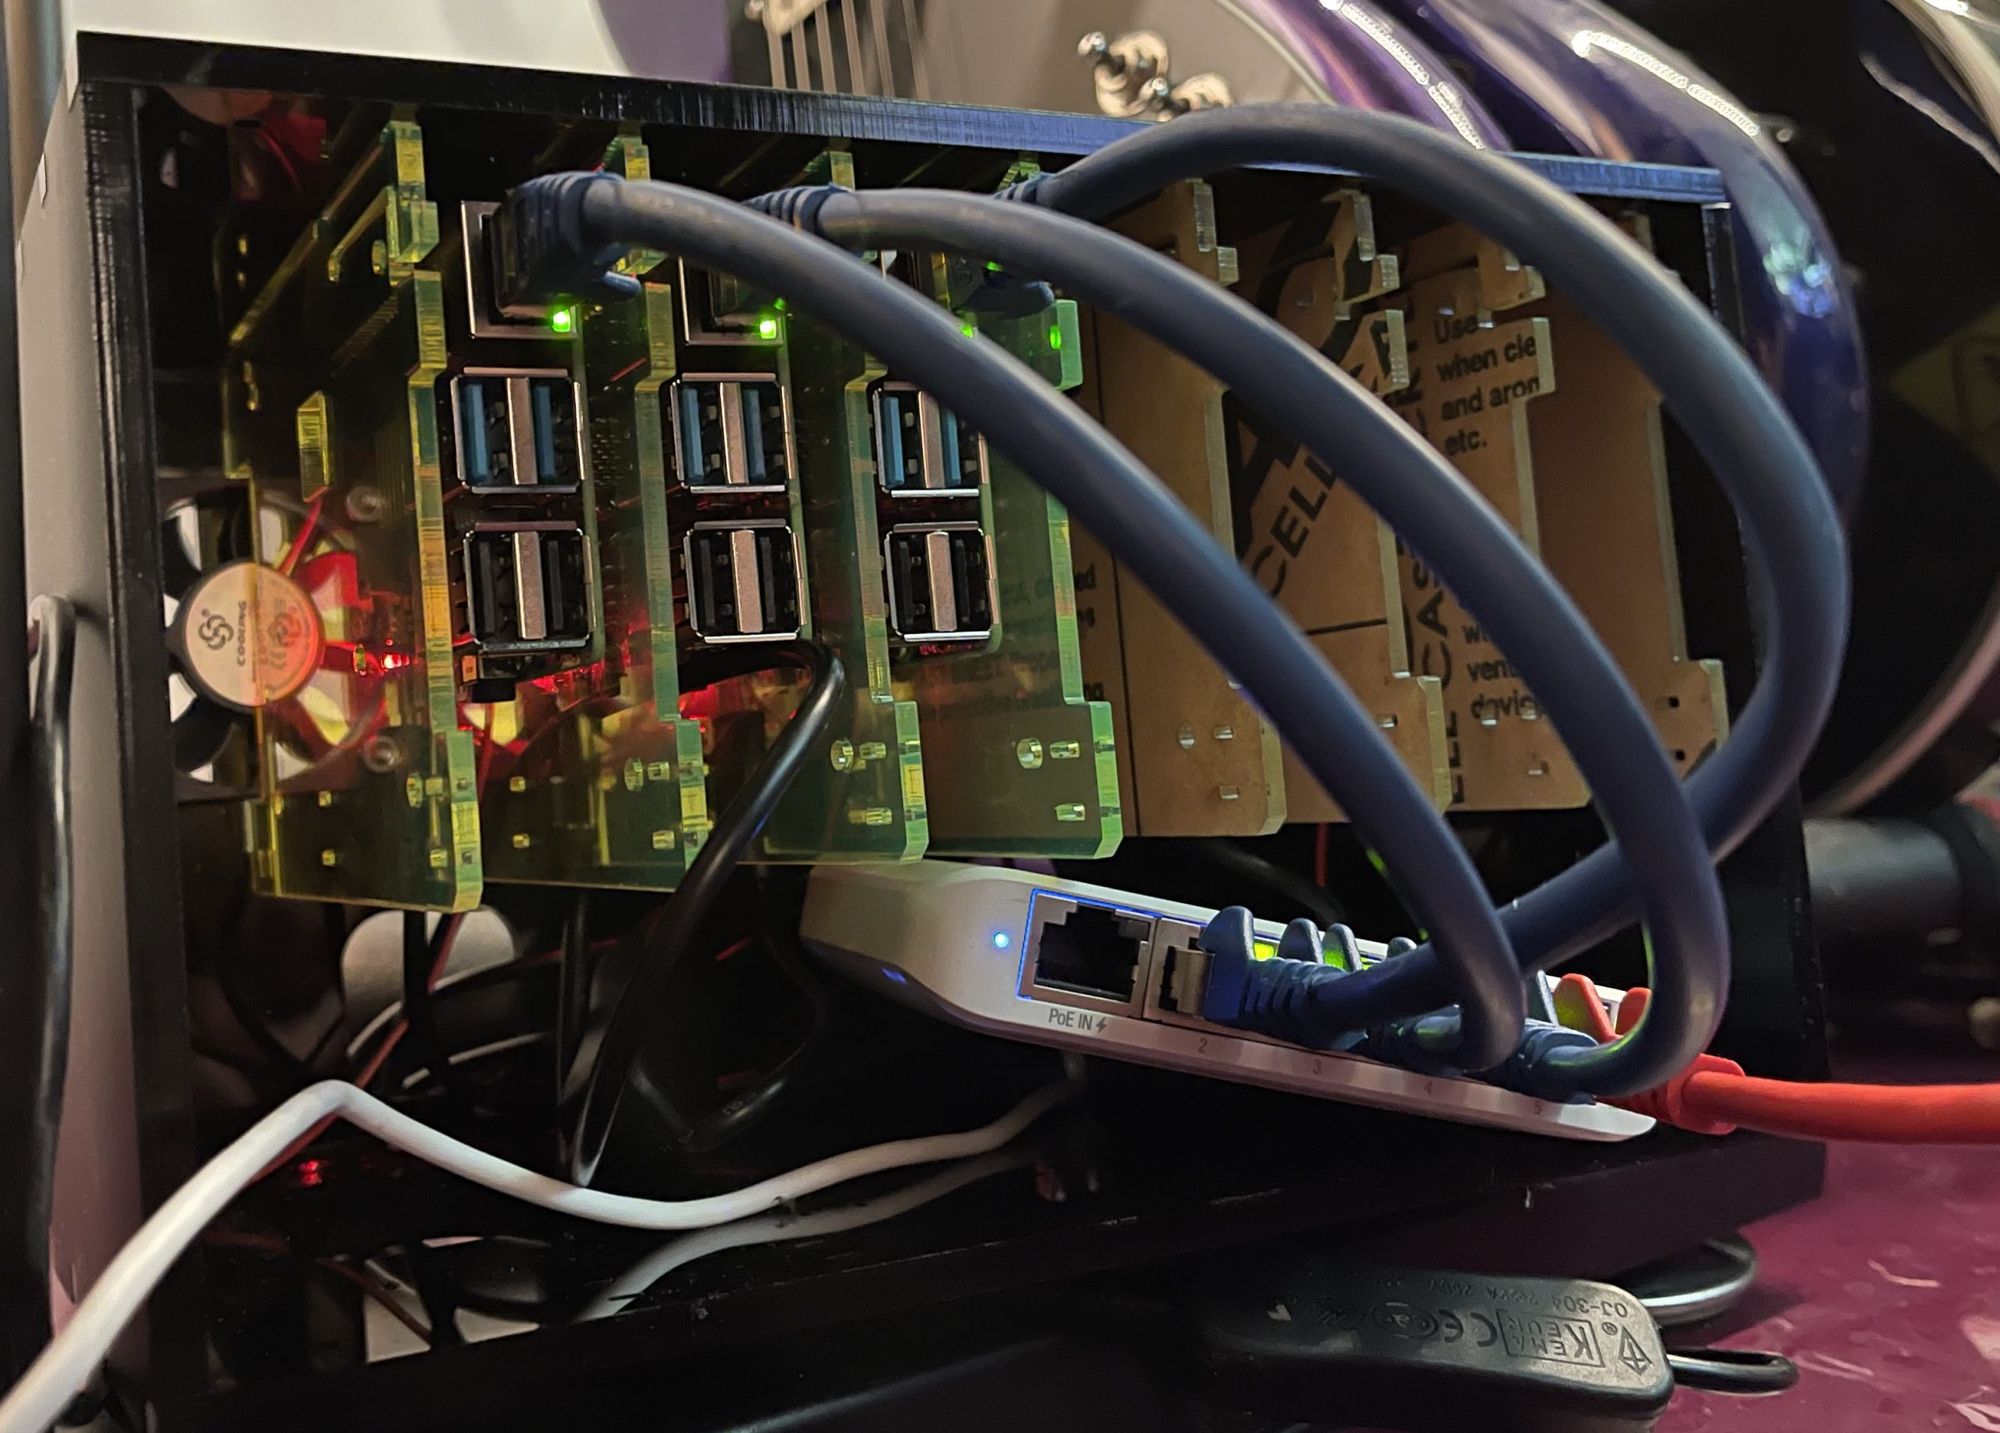
I wanted to try out how it worked and mechanics behind the words and technologies, without jumping into the big pool and using cloud services. What’s better to try to do the same but with small computers like Raspberry Pi ?

If you want to do the same, you will need

  • 2 Raspberry Pi at least
  • and that’s it

I won’t detail the Raspberry installation and configuration, we will use Raspbian 64bit lite up to date and accessing it through SSH.

Install Kubernetes cluster

For the purpose of this blog and using “simple” Raspberry Pis (3 and 4) we will use K3S which is a lightweight version of Kubernetes packaged by Rancher : K3s: Lightweight Kubernetes

{{ .Site.Title }}

Here we go

first we need to edit the cmdline.txt file

Source code   
sudo nano /boot/cmdline.txt

and add cgroup_enable=cpuset cgroup_enable=memory cgroup_memory=1  at the end of the first line

Save the file and close then reboot the Pi

Once backup, just run this command on your chosen master Pi :

curl -sfL https://get.k3s.io | sh -

you should see something similar :

Source code   
[INFO]  Finding release for channel stable
[INFO]  Using v1.22.5+k3s1 as release
[INFO]  Downloading hash https://github.com/k3s-io/k3s/releases/download/v1.22.5+k3s1/sha256sum-arm64.txt
[INFO]  Downloading binary https://github.com/k3s-io/k3s/releases/download/v1.22.5+k3s1/k3s-arm64
[INFO]  Verifying binary download
[INFO]  Installing k3s to /usr/local/bin/k3s
[INFO]  Skipping installation of SELinux RPM
[INFO]  Creating /usr/local/bin/kubectl symlink to k3s
[INFO]  Creating /usr/local/bin/crictl symlink to k3s
[INFO]  Creating /usr/local/bin/ctr symlink to k3s
[INFO]  Creating killall script /usr/local/bin/k3s-killall.sh
[INFO]  Creating uninstall script /usr/local/bin/k3s-uninstall.sh
[INFO]  env: Creating environment file /etc/systemd/system/k3s.service.env
[INFO]  systemd: Creating service file /etc/systemd/system/k3s.service
[INFO]  systemd: Enabling k3s unit
Created symlink /etc/systemd/system/multi-user.target.wants/k3s.service → /etc/systemd/system/k3s.service.
[INFO]  systemd: Starting k3s

that’s it, you’re up and running !

If you want to check what’s going on you can run the following command :

Source code   
kubectl get pods -A

which will give you something similar

Source code   
NAMESPACE     NAME                                     READY   STATUS      RESTARTS   AGE
 
kube-system   metrics-server-9cf544f65-46hln           1/1     Running     0          2m43s
 
kube-system   local-path-provisioner-64ffb68fd-7smmx   1/1     Running     0          2m43s
 
kube-system   coredns-85cb69466-kq98w                  1/1     Running     0          2m43s
 
kube-system   helm-install-traefik-crd--1-cr9mz        0/1     Completed   0          2m43s
 
kube-system   helm-install-traefik--1-x7b8m            0/1     Completed   2          2m43s
 
kube-system   svclb-traefik-m8r4h                      2/2     Running     0          82s
 
kube-system   traefik-786ff64748-djb2b                 1/1     Running     0          82s

Add node to the cluster

Now we need to add node to the existing cluster. Before that we need to get the token to identify the primary master of the universe node by running this command on the Pi where K3S is running :

Source code   
sudo cat /var/lib/rancher/k3s/server/token

you’ll get a token that we will use to add node to the cluster, this token looks like that :

Source code   
K10ac054c3c9514d6f2baa5e4bf59b04df0cc4be73fde287141002e6638ea1a42df::server:cb2a8de367271765289249805bffd662
Source code   
curl -sfL https://get.k3s.io | K3S_URL=https://yourPiMasterIPAddress:6443 K3S_TOKEN=yourToken sh -

If you want to name your node you can also add KS3_NAME=NameOfyourNodeInTheCluster in this command line

You should see something like that :

Source code   
[INFO]  Finding release for channel stable
[INFO]  Using v1.22.5+k3s1 as release
[INFO]  Downloading hash https://github.com/k3s-io/k3s/releases/download/v1.22.5+k3s1/sha256sum-arm64.txt
[INFO]  Downloading binary https://github.com/k3s-io/k3s/releases/download/v1.22.5+k3s1/k3s-arm64
[INFO]  Verifying binary download
[INFO]  Installing k3s to /usr/local/bin/k3s
[INFO]  Skipping installation of SELinux RPM
[INFO]  Creating /usr/local/bin/kubectl symlink to k3s
[INFO]  Creating /usr/local/bin/crictl symlink to k3s
[INFO]  Creating /usr/local/bin/ctr symlink to k3s
[INFO]  Creating killall script /usr/local/bin/k3s-killall.sh
[INFO]  Creating uninstall script /usr/local/bin/k3s-agent-uninstall.sh
[INFO]  env: Creating environment file /etc/systemd/system/k3s-agent.service.env
[INFO]  systemd: Creating service file /etc/systemd/system/k3s-agent.service
[INFO]  systemd: Enabling k3s-agent unit
Created symlink /etc/systemd/system/multi-user.target.wants/k3s-agent.service → /etc/systemd/system/k3s-agent.service.
[INFO]  systemd: Starting k3s-agent

To check if all nodes are online you can verify by using this command lin :

Source code   
sudo kubectl get nodes -o wide

and you should see :

NAME       STATUS   ROLES                  AGE     VERSION

Source code   
rpi4-cl1   Ready    control-plane,master   7m13s   v1.22.5+k3s1
 
rpi4-cl3   Ready    <none>                 9s      v1.22.5+k3s1
 
rpi4-cl2   Ready    <none>                 35s     v1.22.5+k3s1

Which means you’re all good 🙂

  • rpi4-cl1 is the master
  • rpi4-cl2 is a node
  • rpi4-cl3 is a node

Next steps would be to understand why kubernetes is a technology that can bring something to certain use cases
Total
21
Shares
Tweet 0
Share 0
Share 21
Share 0
Share 0
Share 0
Share 0
Related Topics
  • Docker
  • K3S
  • Kubernetes
  • Pi
  • Raspberry Pi
Stephane Thirion

Previous Article
  • Ubiquiti

Creating isolated / dedicated networks with Ubiquiti UniFi

  • December 27, 2021
  • Stephane Thirion
View Post
Next Article
  • VMware
  • vSphere
  • Windows 2022

Migrating FSMO roles Windows 2022 Server

  • January 3, 2022
  • Stephane Thirion
View Post
You May Also Like
View Post
  • Citrix
  • Citrix Virtual Apps and Desktops
  • Cloud
  • DaaS
  • Microsoft
  • PowerShell
  • VMware
  • vSphere

Create vmware service account for MCS Citrix

  • Stephane Thirion
  • February 28, 2023
View Post
  • Experience
  • Raspberry

Install Zigbee2MQTT on a Raspberry Pi Zero W

  • Stephane Thirion
  • July 8, 2022
View Post
  • Docker
  • Experience
  • Kubernetes
  • Linux
  • Raspberry

Kubernetese cluster use with Crypto Currency (Monero)

  • Stephane Thirion
  • January 4, 2022
View Post
  • ArchY.net Site
  • Azure
  • Citrix
  • Cloud
  • Experience
  • Microsoft
  • News
  • Office365
  • Raidho
  • VMware

Mettre en place une solution de travail à distance (RemoteOffice / Remoteworking) 2/2

  • Stephane Thirion
  • March 24, 2020
View Post
  • Amazon
  • Citrix
  • Cloud
  • Experience
  • Microsoft
  • News
  • Office365
  • Raidho
  • Security
  • VMware

Mettre en place une solution de travail à distance (RemoteOffice / Remoteworking) 1/2

  • Stephane Thirion
  • March 22, 2020
View Post
  • Azure
  • Azure
  • Citrix
  • Citrix Virtual Apps and Desktops
  • Cloud
  • Microsoft
  • Windows 2019
  • Windows Virtual Desktop

Microsoft, Citrix, 2019, 1808.2 etc…

  • Stephane Thirion
  • October 16, 2018
View Post
  • ArchY.net Site
  • Azure
  • Azure
  • Cloud
  • Microsoft

My lab died… Now what ?

  • Stephane Thirion
  • February 28, 2017
View Post
  • Azure
  • Azure
  • Citrix
  • Cloud
  • Microsoft
  • VDI
  • Windows 10
  • Windows 2016
  • XenApp
  • XenDesktop

CloudBurtsting XenApp / XenDesktop in Azure 2/2

  • Stephane Thirion
  • February 1, 2017
vmware
Binance – Affiliated link
Coinbase – Affiliated link
Blog Stats
  • 1,239,188 hits
Categories
  • Amazon (1)
  • Apple (20)
    • iOS (5)
    • Mac OSx (11)
  • ArchY.net Site (30)
  • Azure (8)
  • Certifications (3)
  • Citrix (211)
    • ADC (4)
    • Citrix Virtual Apps and Desktops (5)
    • DaaS (2)
    • NetScaler (15)
    • Password Manager (3)
    • Personal vDisk (5)
    • Power and Capacity Management (3)
    • Provisioning Services (22)
    • Receiver (29)
    • SDX (2)
    • ShareFile (8)
    • Single Sign On (3)
    • SmartAuditor (2)
    • Storefront (12)
    • Synergy (25)
    • User Profile Management (2)
    • VDI (7)
    • WebInterface (21)
    • XenApp (84)
    • XenApp Plugin (3)
    • XenClient (10)
    • XenDesktop (55)
    • XenServer (42)
  • Cloud (13)
  • Crystal Ball (2)
  • CTP (13)
  • Docker (2)
  • Events (35)
    • E2E – PubForum (9)
    • Geek Speak (3)
  • Experience (53)
  • Kubernetes (2)
  • Licensing (3)
  • Linux (12)
  • Microsoft (147)
    • Active Directory (1)
    • Azure (8)
    • Office365 (4)
    • PowerShell (19)
    • RDS (5)
    • Windows 10 (6)
    • Windows 2003 (21)
    • Windows 2008 (20)
    • Windows 2008 R2 (54)
    • Windows 2012 (13)
    • Windows 2012R2 (13)
    • Windows 2016 (18)
    • Windows 2019 (4)
    • Windows 2022 (1)
    • Windows 7 (27)
    • Windows 8 (19)
    • Windows Virtual Desktop (1)
    • Windows XP (11)
  • News (5)
  • Raidho (2)
  • Raspberry (3)
  • Scripting (13)
  • Security (5)
  • Slide Deck (1)
  • Thin Clients (3)
  • Twitter (1)
  • Ubiquiti (1)
  • Uncategorized (13)
  • VMware (28)
    • VMWare WorkStation (2)
    • vSphere (16)
Stéphane Thirion
Don't Follow the Trend

Input your search keywords and press Enter.


Loading Comments...