
You've probably used ChatGPT, Claude, or Gemini. They're convenient, but there's a catch: your conversations live on someone else's servers. Every prompt, every personal detail, every half-baked idea goes through their infrastructure.
OpenClaw takes a different approach. It's an open-source AI assistant that runs on your own hardware. You pick the model, set the rules, and decide where your data goes.
Why Run Your Own AI Assistant?
A few reasons people do this:
- Privacy (with local models): Run Ollama or similar, and your conversations never leave your network. No training on your data, no retention policies.
- Cost control: Use local models like Qwen3 or Llama for free, or mix cloud APIs when you need more power.
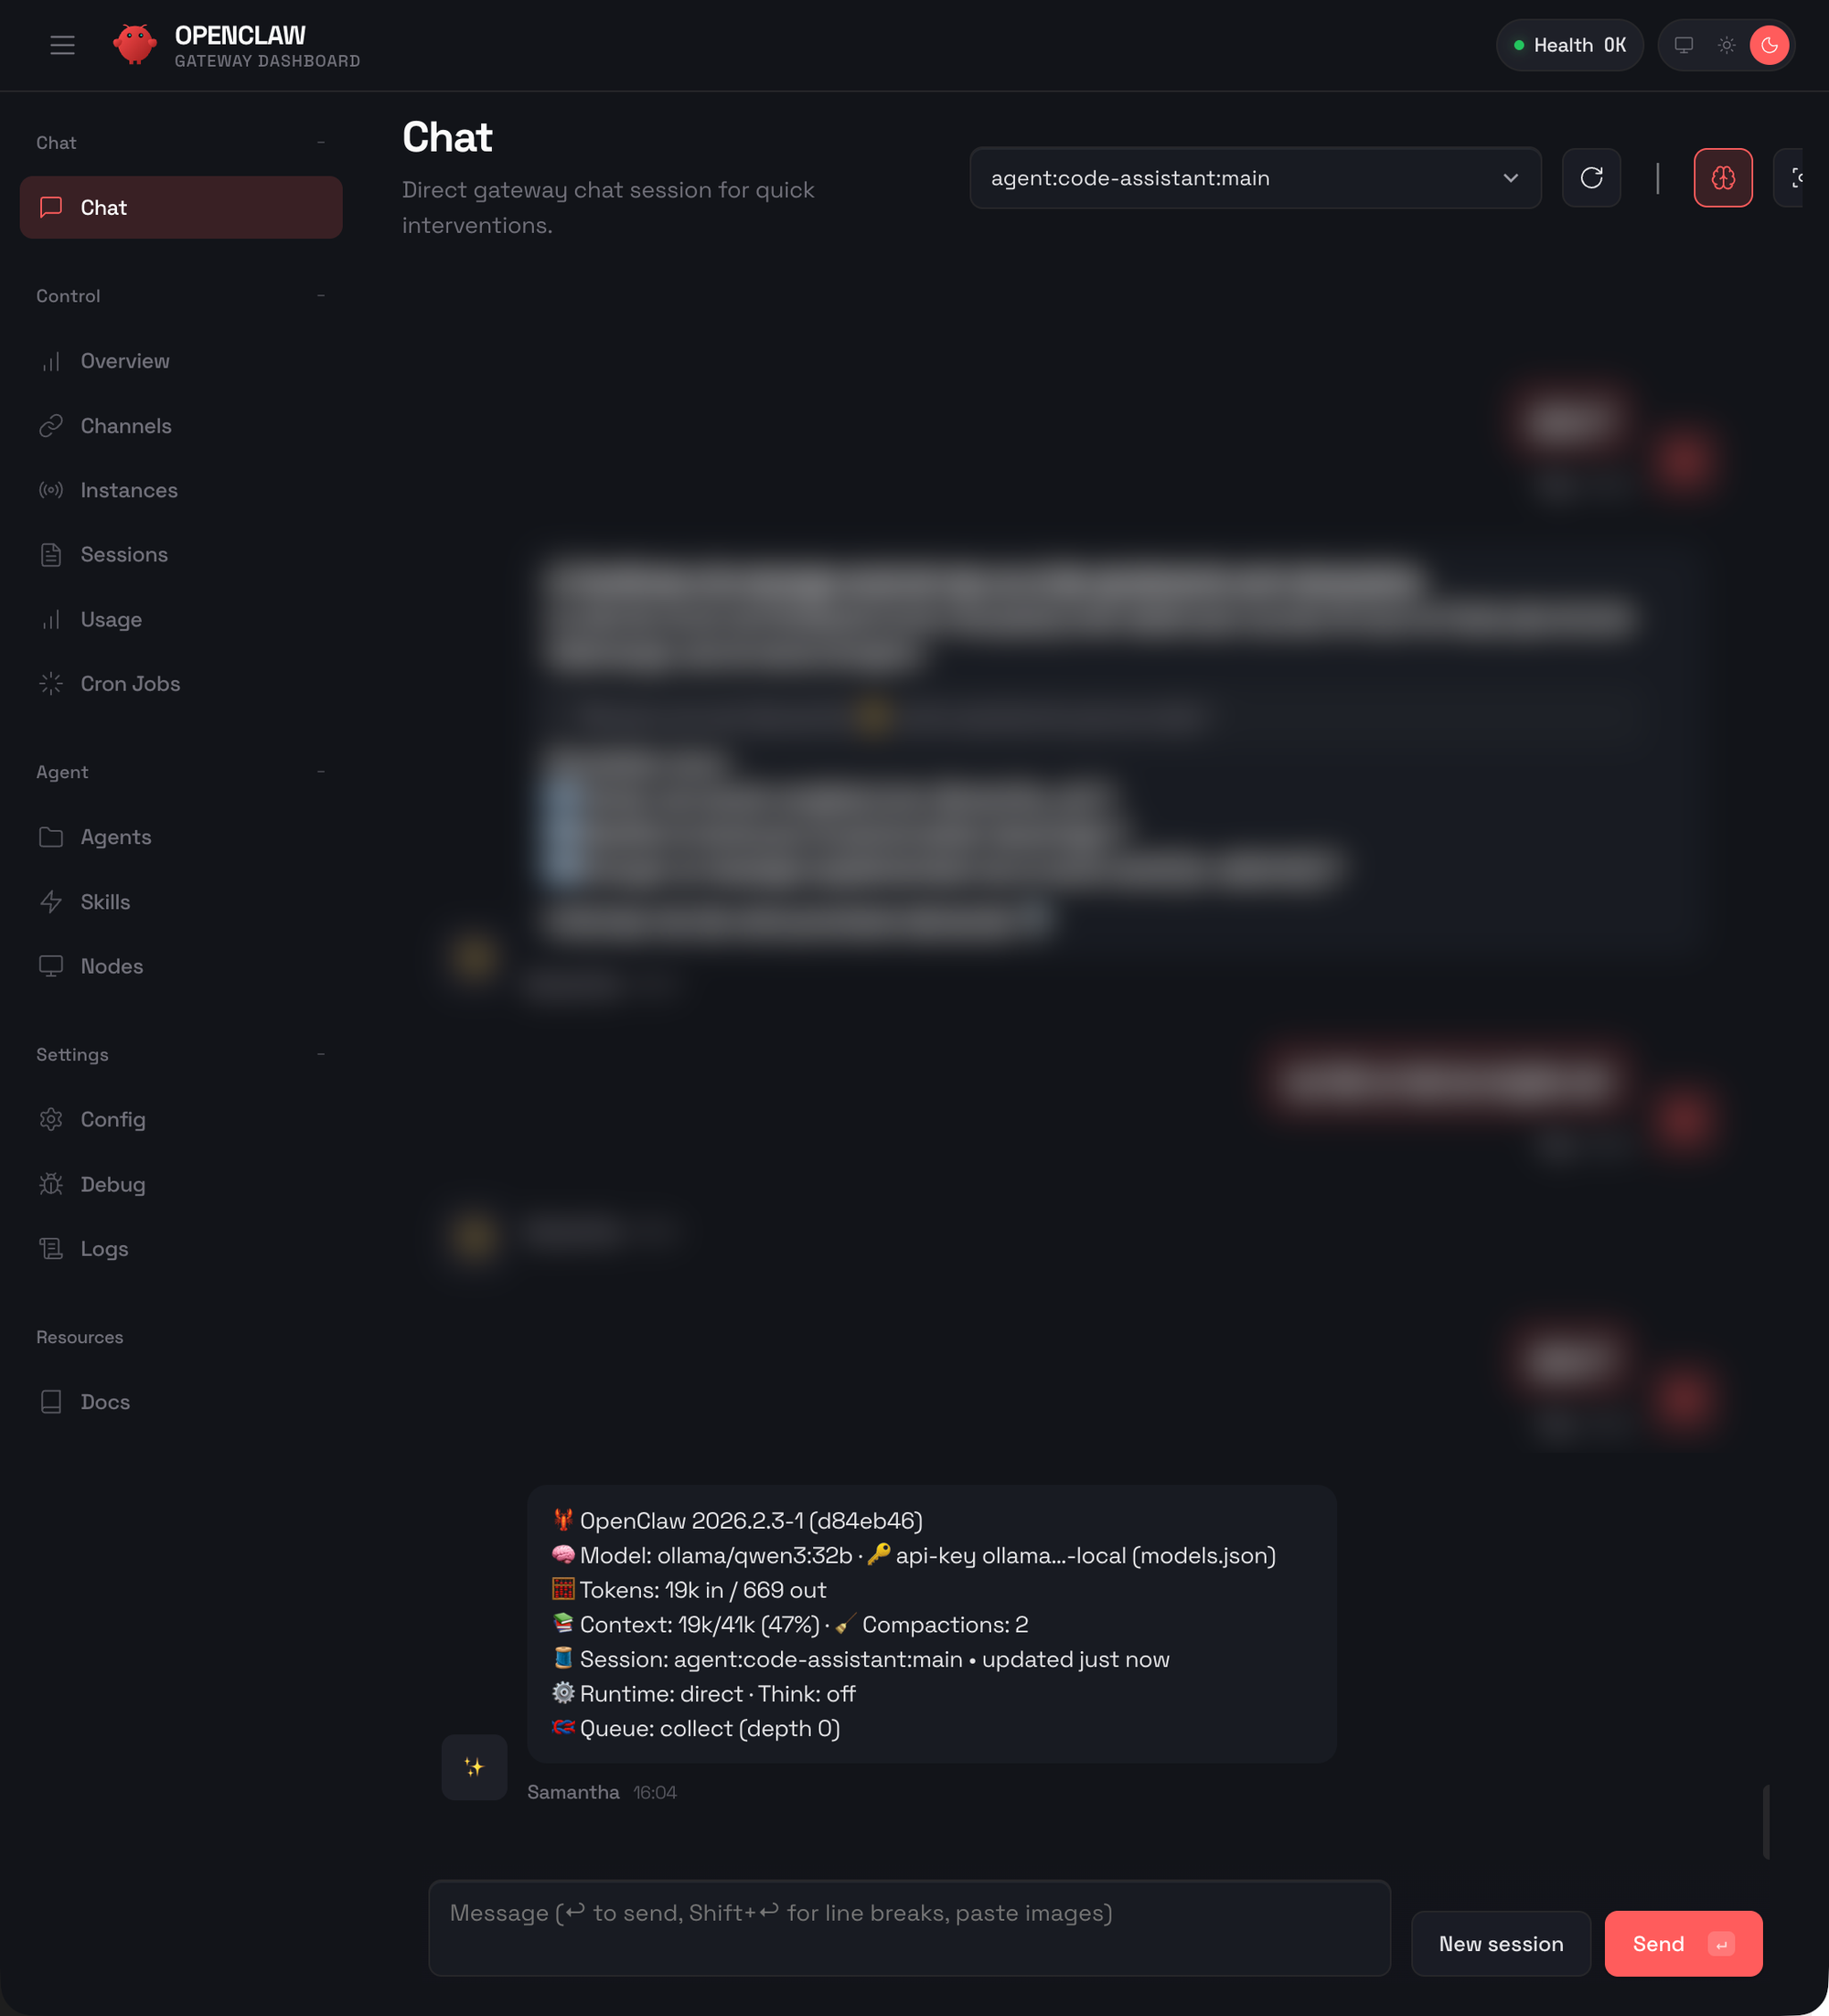
- Integration: OpenClaw connects to Telegram, WhatsApp, Discord, Slack, Signal. It becomes your personal assistant across all platforms.
- Customization: Define your assistant's personality, give it access to your files, let it run shell commands, schedule tasks.
- No limits: No "you've reached your daily limit" messages. No subscription tiers. It's your hardware.
One important caveat: if you use cloud APIs like Anthropic, OpenAI, or Google Gemini, your prompts still go through their servers. For true privacy, you need local models. The good news? Models like Qwen3 and Llama run great on modest hardware, and OpenClaw makes it easy to switch between local and cloud depending on the task.
Think of it as having your own Jarvis, running 24/7 on a Raspberry Pi, a homelab VM, or a cloud VPS. It remembers context across sessions, can browse the web for you, manage your calendar, send messages on your behalf.
What We're Building
This guide covers a production-ready setup: OpenClaw on Ubuntu, HAProxy for HTTPS, and Ollama for local AI models. When you're done:
What This Setup Gives You
Once done:
- ✅ A fully functional AI assistant accessible via HTTPS
- ✅ Web-based Control UI for managing your assistant
- ✅ Telegram bot integration
- ✅ Secure authentication with token-based access
- ✅ Professional reverse proxy setup with HAProxy
- ✅ Local LLM support with Ollama and Qwen3:32b
Prerequisites
System Requirements
- Ubuntu Server 22.04 or 24.04
- 4 vCPUs minimum
- 8GB RAM (32GB+ if running local models)
- 20GB disk (100GB+ for local models)
External Requirements
- Anthropic API key from console.anthropic.com (or use Ollama for local models)
- HAProxy set up (optional, for HTTPS)
- A domain pointing to your server (optional)
Part 1: System Preparation
Step 1: Update Your System
sudo apt-get update
sudo apt-get upgrade -y
Step 2: Install Node.js 22+
OpenClaw needs Node.js 22+:
# Add NodeSource repository
curl -fsSL https://deb.nodesource.com/setup_22.x | sudo -E bash -

# Install Node.js
sudo apt-get install -y nodejs

# Verify installation
node --version  # Should show v22.x.x
npm --version
Step 3: Configure npm for User-Level Global Installs
# Create directory for global packages
mkdir -p ~/.npm-global

# Configure npm to use it
npm config set prefix '~/.npm-global'

# Add to PATH
echo 'export PATH=~/.npm-global/bin:$PATH' >> ~/.bashrc
source ~/.bashrc
Part 2: Installing OpenClaw
Step 4: Install OpenClaw
npm install -g openclaw@latestStep 5: Verify Installation
openclaw --version
Part 3: Configuration Wizard
Step 6: Generate Your Authentication Token
openssl rand -hex 32Save this token securely - you'll need it to access the web interface!
Step 7: Run the Onboarding Wizard
openclaw onboard --install-daemonFollow the prompts:
- Gateway Location: Select
Local - Gateway Auth: Select
Token (recommended) - Model Provider: Select
Anthropic(orOllamafor local) - Primary Model:
claude-sonnet-4-5or local model
Part 4: Configuring Ollama for Local LLM Access
Want to run models locally instead of paying for API calls? Ollama makes it easy.
Step 8: Install Ollama
curl -fsSL https://ollama.com/install.sh | shStep 9: Configure Ollama for Network Access
Ollama only listens on localhost by default. To let OpenClaw connect from elsewhere:
# Edit the systemd service
sudo systemctl edit ollama.service
Add this content:
[Service]
Environment="OLLAMA_HOST=0.0.0.0"
Restart Ollama:
sudo systemctl daemon-reload
sudo systemctl restart ollama
Step 10: Pull Qwen3:32b Model
ollama pull qwen3:32bThat downloads about 20GB. If you want something lighter:
ollama pull qwen3:8b # Faster, less resource-intensiveStep 11: Configure OpenClaw to Use Ollama
Edit your OpenClaw configuration:
nano ~/.openclaw/openclaw.jsonAdd Ollama as a provider in the auth.profiles section:
"auth": {
  "profiles": {
    "ollama:local": {
      "provider": "ollama",
      "mode": "none",
      "baseUrl": "http://YOUR-OLLAMA-IP:11434"
    },
    "anthropic:default": {
      "provider": "anthropic",
      "mode": "api_key"
    }
  }
}
Set your default model to use Ollama:
"agent": {
  "model": "ollama/qwen3:32b"
}
Step 12: Test Ollama Connection
# Verify Ollama is running
curl http://localhost:11434/api/tags

# Restart OpenClaw to apply changes
systemctl --user restart openclaw-gateway
Part 5: Configuration for Reverse Proxy
Step 13: Edit Configuration for HAProxy
nano ~/.openclaw/openclaw.jsonSet up the gateway:
"gateway": {
  "port": 18789,
  "mode": "local",
  "bind": "lan",
  "controlUi": {
    "enabled": true,
    "allowInsecureAuth": true
  },
  "auth": {
    "mode": "token",
    "token": "YOUR-TOKEN-HERE"
  },
  "trustedProxies": [
    "HAPROXY-IP-1",
    "HAPROXY-IP-2"
  ]
}
Key settings:
bind: "lan"- Allows connections from your networkallowInsecureAuth: true- Required for proxy accesstrustedProxies- Your HAProxy server IPs
Step 14: Restart the Gateway
systemctl --user restart openclaw-gateway
systemctl --user status openclaw-gateway
Part 6: HAProxy Configuration
Step 15: Configure HAProxy Backend
backend openclaw_backend
    description OpenClaw AI Assistant Gateway
    balance roundrobin
    option http-server-close
    option forwardfor
    timeout server 3600s
    timeout tunnel 3600s
    option httpchk GET /
    server openclaw01 192.168.0.243:18789 check inter 20s rise 2 fall 3 maxconn 50
Step 16: Configure HAProxy Frontend
frontend https_frontend
    bind *:443 ssl crt /etc/haproxy/certs/
    http-request set-header X-Forwarded-Proto https
    http-request set-header X-Forwarded-Host  %[req.hdr(Host)]
    http-request set-header X-Forwarded-For   %[src]

    acl host_openclaw hdr(host) -i your-domain.com
    use_backend openclaw_backend if host_openclaw
Step 17: Reload HAProxy
sudo systemctl reload haproxyPart 7: Testing Your Installation
Step 18: Test Access
# Test local access
curl -I http://192.168.0.243:18789

# Test Ollama model
curl http://localhost:11434/api/generate -d '{
  "model": "qwen3:32b",
  "prompt": "Hello!"
}'
Step 19: Access the Web UI
Open your browser:
https://your-domain.com/?token=YOUR-TOKEN-HEREPart 8: Telegram Integration (Optional)
Step 20: Configure Telegram Bot
- Open Telegram and search for your bot
- Send
/startto the bot - Approve pairing:
openclaw pairing list
openclaw pairing approve telegram <CODE>
Security Tips
- Strong Tokens: Use
openssl rand -hex 32 - HTTPS Only: Never expose over plain HTTP publicly
- Network Restrictions: Use HAProxy ACLs to restrict access
- Keep Updated:
npm update -g openclaw - Backup Config:
cp ~/.openclaw/openclaw.json ~/.openclaw/openclaw.json.backup
Resources
- Official Documentation: https://docs.openclaw.ai
- GitHub Repository: https://github.com/openclaw/openclaw
- Discord Community: https://discord.gg/clawd
- Ollama Documentation: https://ollama.com/library
That's the whole setup. You now have OpenClaw running with both cloud and local options. Use Anthropic or OpenAI when you need top-tier quality. Switch to Ollama when privacy matters or you just don't want to pay per token.
Things to remember:
- OpenClaw requires Node.js 22+
allowInsecureAuth: trueis required when running behind a proxy- Ollama works great for running local models like Qwen3
- Configure
OLLAMA_HOST=0.0.0.0for network access