Monitoring vehicle speeds was not my life goal, but witnessing my wife and two of my kids almost being run over in front of our home by a truck speeding at almost 60 km/h in our 30 km/h limited street made me act. I sent an email to the mayor of my city. The police were sent to check for speeders for a weekend, then it was over. So I needed a system to bring real, longer-term proof that action was needed.
Traditional radar traps and expensive speed cameras are not always practical for communities or individuals. Thanks to open-source tools, affordable cameras, and modern computer vision libraries, it is now possible to build a sophisticated speed monitoring system yourself.
This post explains how I built a complete vehicle speed monitor using a UniFi G4 Doorbell Pro camera and Python. The system detects vehicles in real time, measures their speed, records violations with photos, and provides advanced analytics through a web interface powered by AI (Machine Learning).
You can find the full source code and contribute on my GitLab

What This System Does
This system uses OpenCV to process a live RTSP camera feed and detect vehicles crossing two virtual detection lines. It measures how long a vehicle takes to travel between them, compares that to the real distance you configure, and calculates its speed. If the speed is above your threshold, the system saves a screenshot and logs the violation in a local SQLite database.
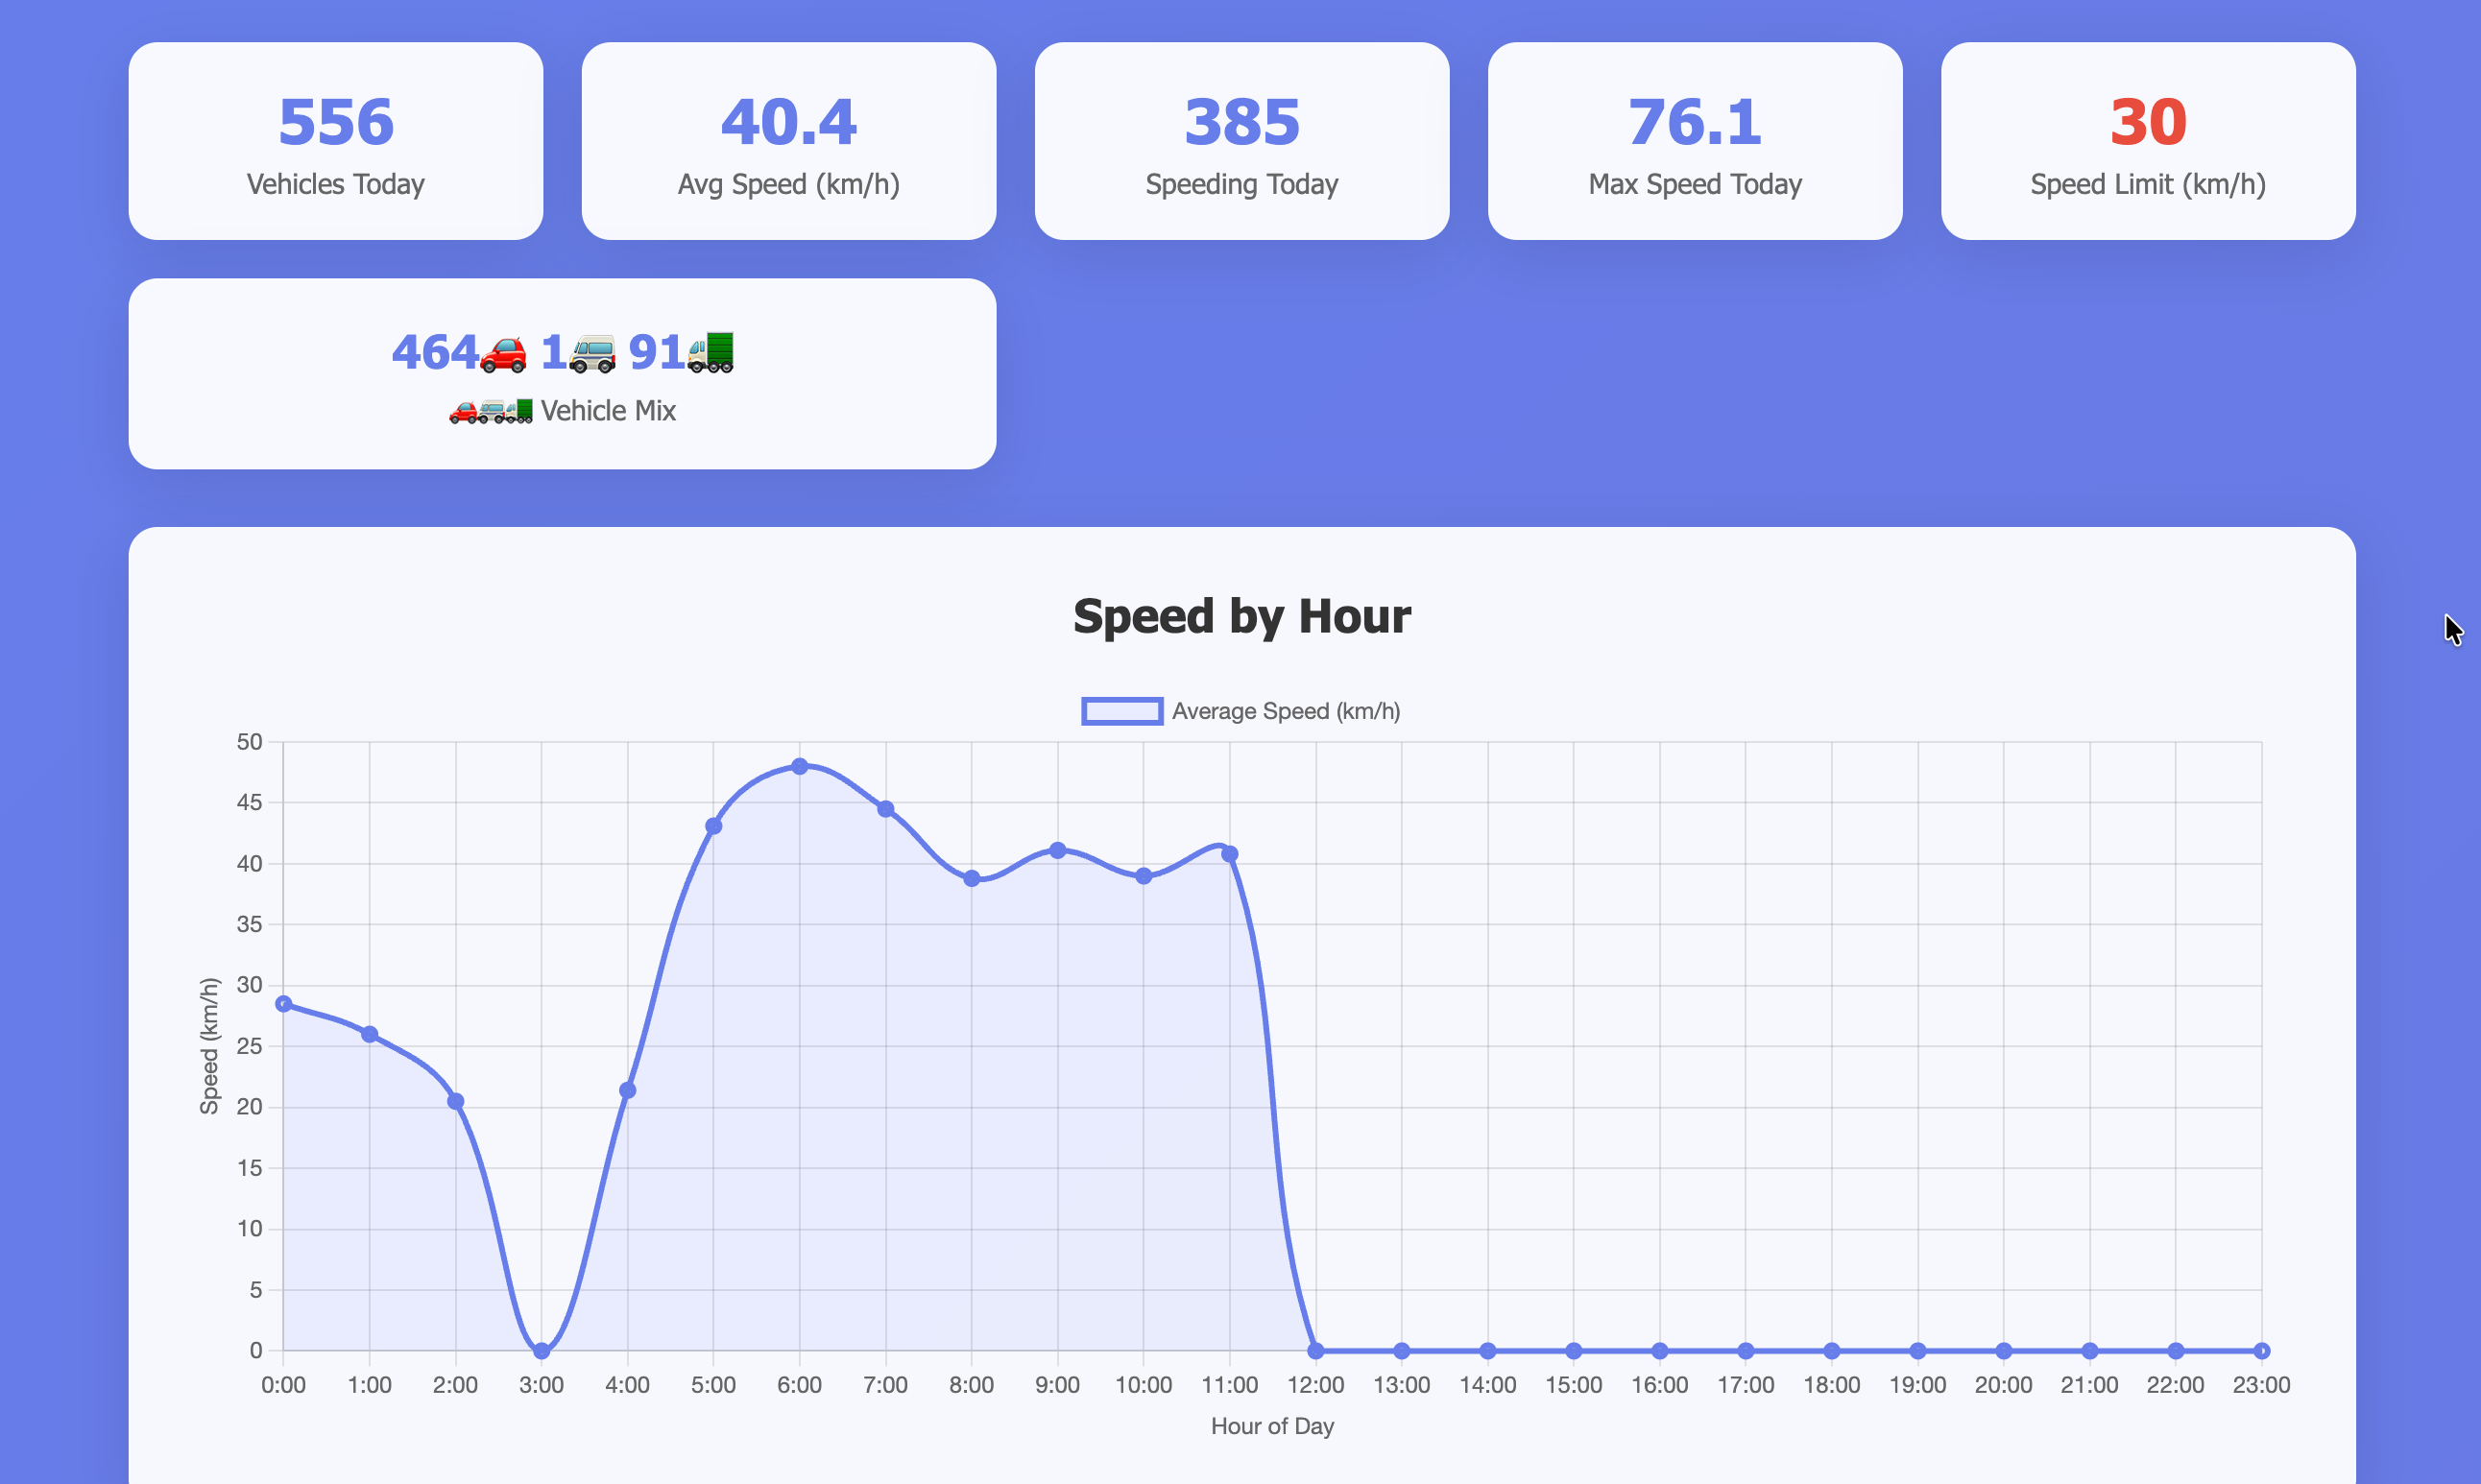
The web interface shows live stats, daily, weekly, and monthly trends, and provides machine learning insights like vehicle classification, anomaly detection, and predictions.
Why Positioning and Calibration Matter
Getting accurate speed measurements depends entirely on where you place the detection lines and how well you calibrate the real-world distance between them. If your lines are not placed perpendicular to the vehicle’s path or if the distance is not measured precisely, the calculated speeds will be wrong.
A small misalignment of the lines or an incorrect distance can result in speed readings that are too high or too low. That’s why calibration is crucial: you must drive through the detection zone at a known speed and adjust your settings until the measured speed matches reality. This ensures your data is reliable and your system can produce valid evidence if needed.
Key Features
- Real-time vehicle detection and speed measurement using OpenCV.
- Dual-direction monitoring with different calibration for each lane if needed.
- Automatic screenshots for each speed violation.
- Machine learning for vehicle type classification and anomaly detection.
- Historical trends and predictions based on traffic data.
- Fully responsive dashboard with data export (CSV, JSON, Excel).
Hardware and Server Requirements
Camera
- Any RTSP-compatible camera.
- UniFi G4 Doorbell Pro recommended for reliable HD streaming.
Server
- Ubuntu 24.04 Server.
- Python 3.12 or newer.
- Minimum 4 GB RAM (8 GB recommended for machine learning features).
- At least 10 GB storage for database and screenshots.
Step 1: Prepare Ubuntu 24.04
Update your server first:
sudo apt update && sudo apt upgrade -y
Step 2: Install Required Packages
Install system libraries needed for OpenCV, streaming, and ML.
sudo apt install -y \
  python3 python3-pip python3-dev python3-venv \
  build-essential cmake pkg-config \
  libgl1-mesa-glx libglib2.0-0 libsm6 libxext6 libxrender-dev \
  libgomp1 libgtk-3-0 libavcodec-dev libavformat-dev libswscale-dev \
  libgstreamer1.0-dev libgstreamer-plugins-base1.0-dev \
  libxvidcore-dev libx264-dev libjpeg-dev libpng-dev libtiff-dev \
  gfortran libatlas-base-dev libhdf5-dev libhdf5-serial-dev \
  libfontconfig1-dev libcairo2-dev libgdk-pixbuf2.0-dev \
  libpango1.0-dev libgtk2.0-dev libgtk-3-dev git curl wget
Step 3: Clone and Setup
Clone the project into /opt.
cd /opt
sudo git clone https://gitlab.raidho.fr/Stephane/vehicle-speed-monitor.git
sudo chown -R $USER:$USER vehicle-speed-monitor
cd vehicle-speed-monitor

chmod +x start_monitor.sh
./start_monitor.sh
The script sets up a Python virtual environment, installs all dependencies, creates the database, and starts the monitor.
Step 4: Run as a Service
Create a systemd service so the monitor runs continuously.
sudo tee /etc/systemd/system/vehicle-monitor.service > /dev/null <<EOF
[Unit]
Description=Vehicle Speed Monitor
After=network.target

[Service]
Type=simple
User=$USER
WorkingDirectory=/opt/vehicle-speed-monitor
Environment=PATH=/opt/vehicle-speed-monitor/venv/bin
ExecStart=/opt/vehicle-speed-monitor/venv/bin/python vehicle_speed_monitor.py
Restart=always
RestartSec=10

[Install]
WantedBy=multi-user.target
EOF

sudo systemctl daemon-reload
sudo systemctl enable vehicle-monitor
sudo systemctl start vehicle-monitor
sudo systemctl status vehicle-monitor
Step 5: Open the Web Port
sudo ufw allow 5000/tcp
sudo ufw reload
Python Dependencies
Server version uses opencv-python-headless:
numpy>=1.21,<2.0
opencv-python-headless>=4.5.0,<5.0
flask>=2.0.0
pandas>=1.3.0
scikit-learn>=1.0.0
scipy>=1.7.0
Pillow>=8.0.0
python-dateutil>=2.8.0
Configure Detection Lines
Edit config.json to match your street and camera angle.
{
  "rtsp_url": "rtsps://192.168.0.1:7441/your_camera_feed",
  "detection_lines": {
    "line_a": [[600, 500], [1000, 500]],
    "line_b": [[600, 700], [1000, 700]]
  },
  "distances": {
    "a_to_b": 12.0
  },
  "speed_limit": 30,
  "speeding_threshold": 35
}
How to Calibrate
- Make sure lines are perpendicular to traffic flow.
- Use a tape measure or GPS to measure the real distance.
- Drive through the detection zone at a known speed.
- Compare the recorded speed to your real speed.
- Adjust the distance if needed:
new_distance = old_distance * (real_speed / recorded_speed)
You can enable debug mode to see lines and vehicle tracking:
self.draw_detections(frame, vehicles)
cv2.imshow('Debug View', frame)
Dashboard and API
- Main dashboard:
http://your-server-ip:5000/ - ML analytics:
http://your-server-ip:5000/ml_advanced_safe - Statistics:
http://your-server-ip:5000/statistics
Example API endpoints:
/api/speed_data/api/ml/status/api/ml/predictions
Daily Backups
Add a daily backup:
sudo tee /opt/vehicle-speed-monitor/backup.sh > /dev/null <<'EOF'
#!/bin/bash
BACKUP_DIR="/backup/vehicle-monitor/$(date +%Y%m%d)"
mkdir -p "$BACKUP_DIR"
cp /opt/vehicle-speed-monitor/vehicle_speeds.db "$BACKUP_DIR/"
cp /opt/vehicle-speed-monitor/config.json "$BACKUP_DIR/"
cp -r /opt/vehicle-speed-monitor/ml_models/ "$BACKUP_DIR/" 2>/dev/null || true
tar -czf "$BACKUP_DIR/screenshots.tar.gz" /opt/vehicle-speed-monitor/screenshots/
EOF

chmod +x /opt/vehicle-speed-monitor/backup.sh
echo "0 2 * * * /opt/vehicle-speed-monitor/backup.sh" | sudo crontab -
Accuracy
When your lines are positioned correctly and the system is well calibrated:
- Speed readings within ±2 km/h.
- Over 95% vehicle detection.
- More than 90% ML classification accuracy.
Future Enhancements
Planned updates include:
- Deep learning classification.
- License plate detection where legal.
System Requirements: Ubuntu 24.04 Server, Python 3.12+, OpenCV 4.5+ (headless)
Repo: GitLab
Version: 3.0.0 — July 2025
Install it, calibrate it properly, position your lines precisely, and help your street stay safe.


