
Like many home automation enthusiasts, I wanted to bring my garage door into my smart home ecosystem. My garage door uses a NICE SNA20 motor, a reliable unit but lacking any native smart home capabilities. I successfully integrated it with Home Assistant using an ESP8266-based solution with ESPHome that cost less than €10 and took only a few hours to implement.
The NICE SNA20 is a straightforward garage door opener that responds to a simple momentary contact closure (push button). My goals were:
- Control the door remotely through Home Assistant
- Monitor door status using my existing door sensor
- Keep it local - no cloud dependencies
ESPHome + Wemos D1 Mini
Hardware Required
Here's what I used for this project:
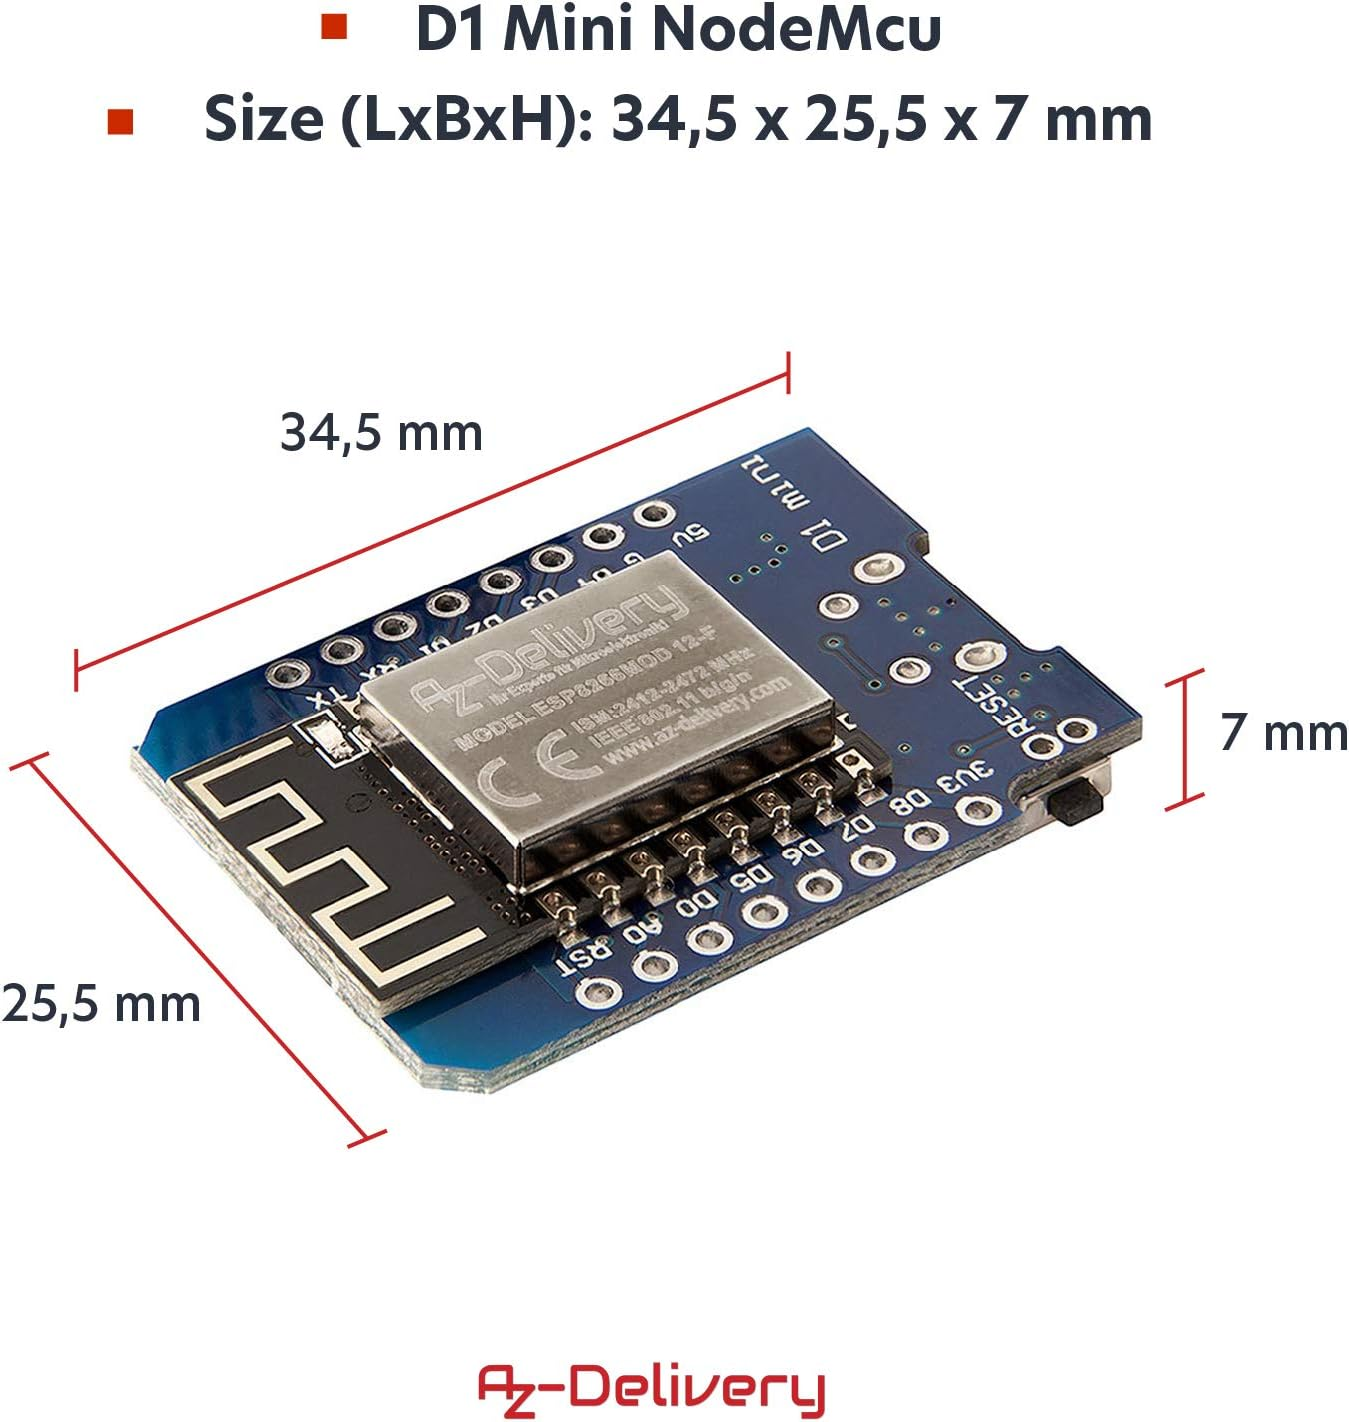
- Wemos D1 Mini (ESP8266) - ~€3
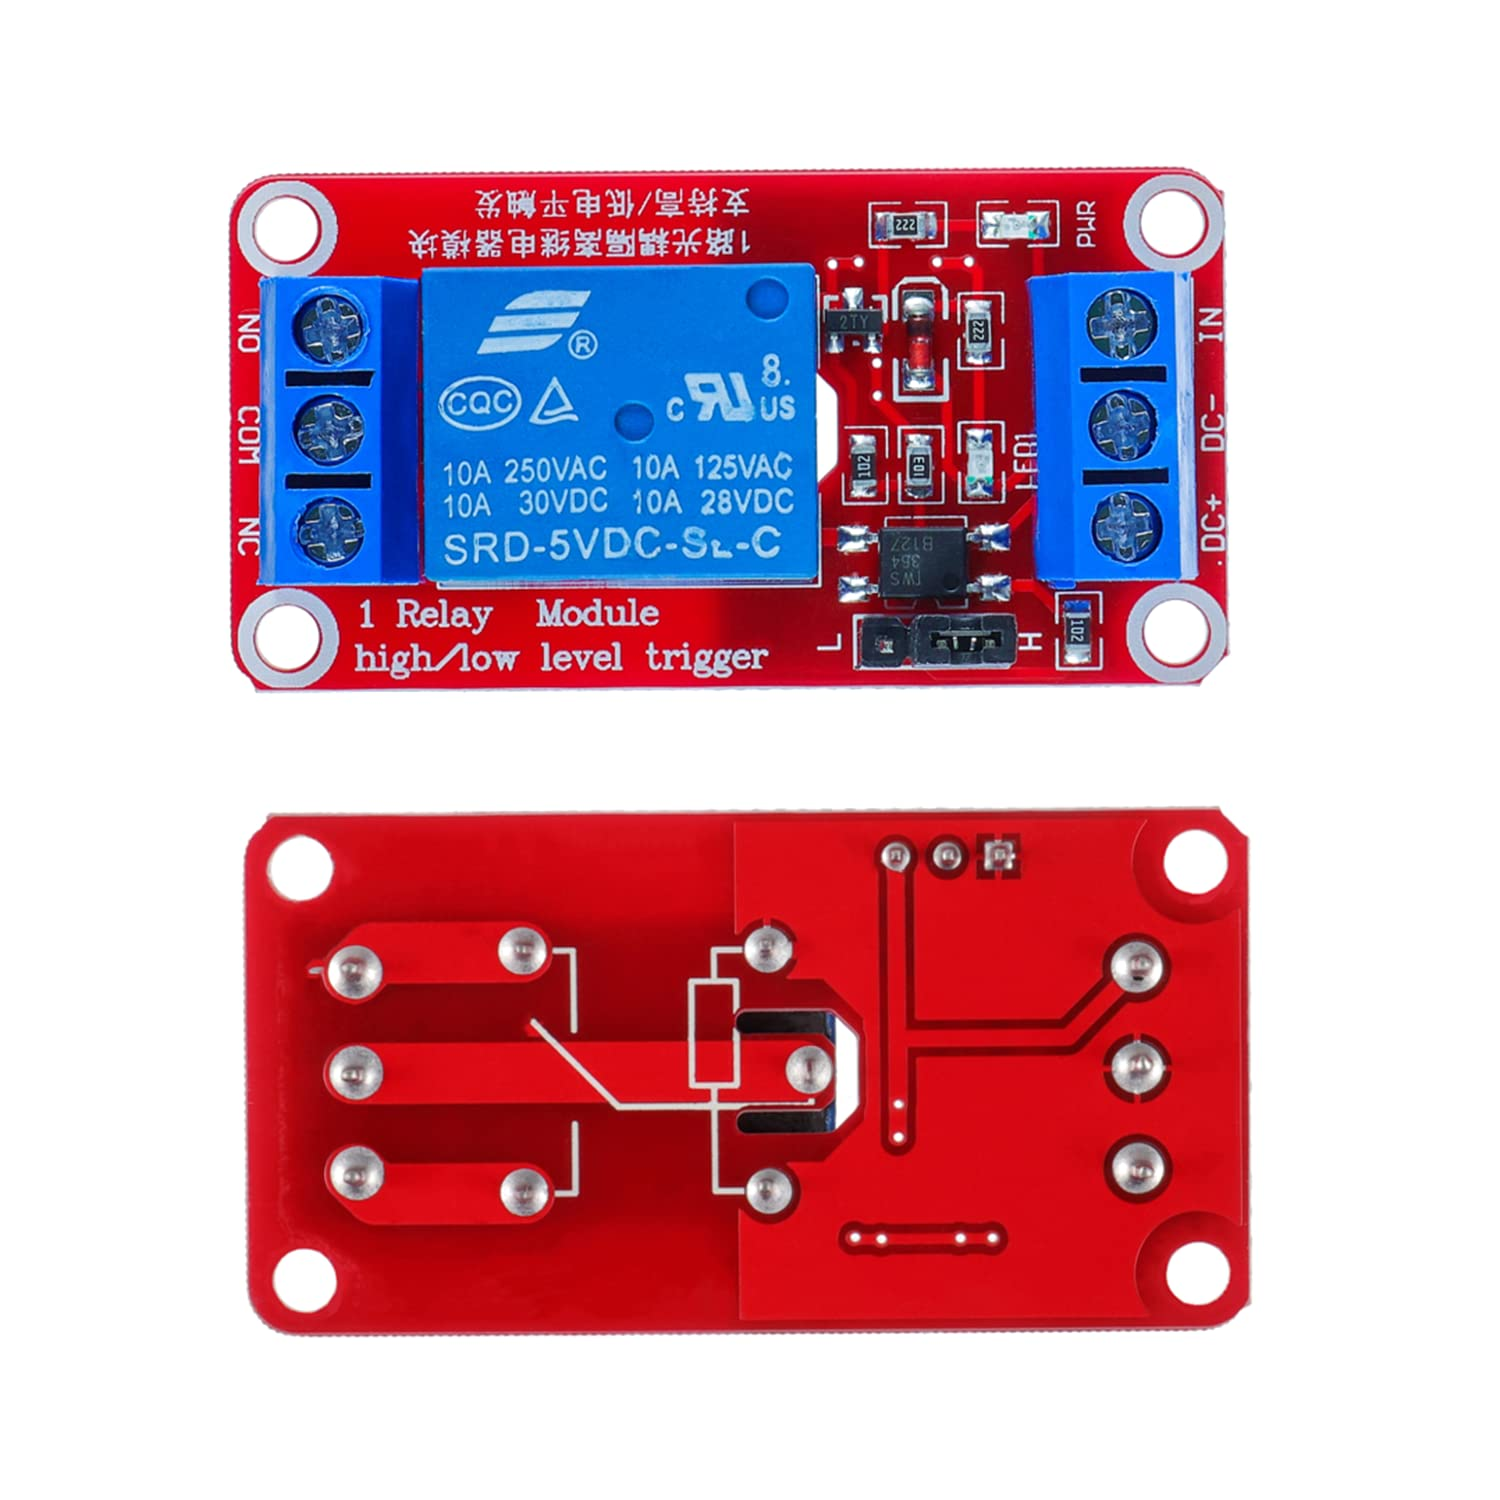
- 5V relay module (1 channel) - ~€2
- 5V power supply (USB charger or buck converter) - ~€3
- Dupont cables for connections
- Existing door sensor (I already had a contact sensor installed Aqara)
- A box (3D printed one, i created one you can grab it with the link bellow)

Total cost: ~€8
How It Works
The concept is simple:
- The Wemos D1 Mini runs ESPHome firmware
- A relay is connected to the Wemos and wired in parallel with the existing push button
- When triggered, the relay simulates a button press (500ms pulse)
- Home Assistant communicates with the ESPHome device via the API
- The existing door sensor reports actual door state (open/closed)
This setup is safe because:
- It doesn't bypass any safety features of the NICE motor
- The photocells and other safety mechanisms remain active
- It's isolated from the mains power
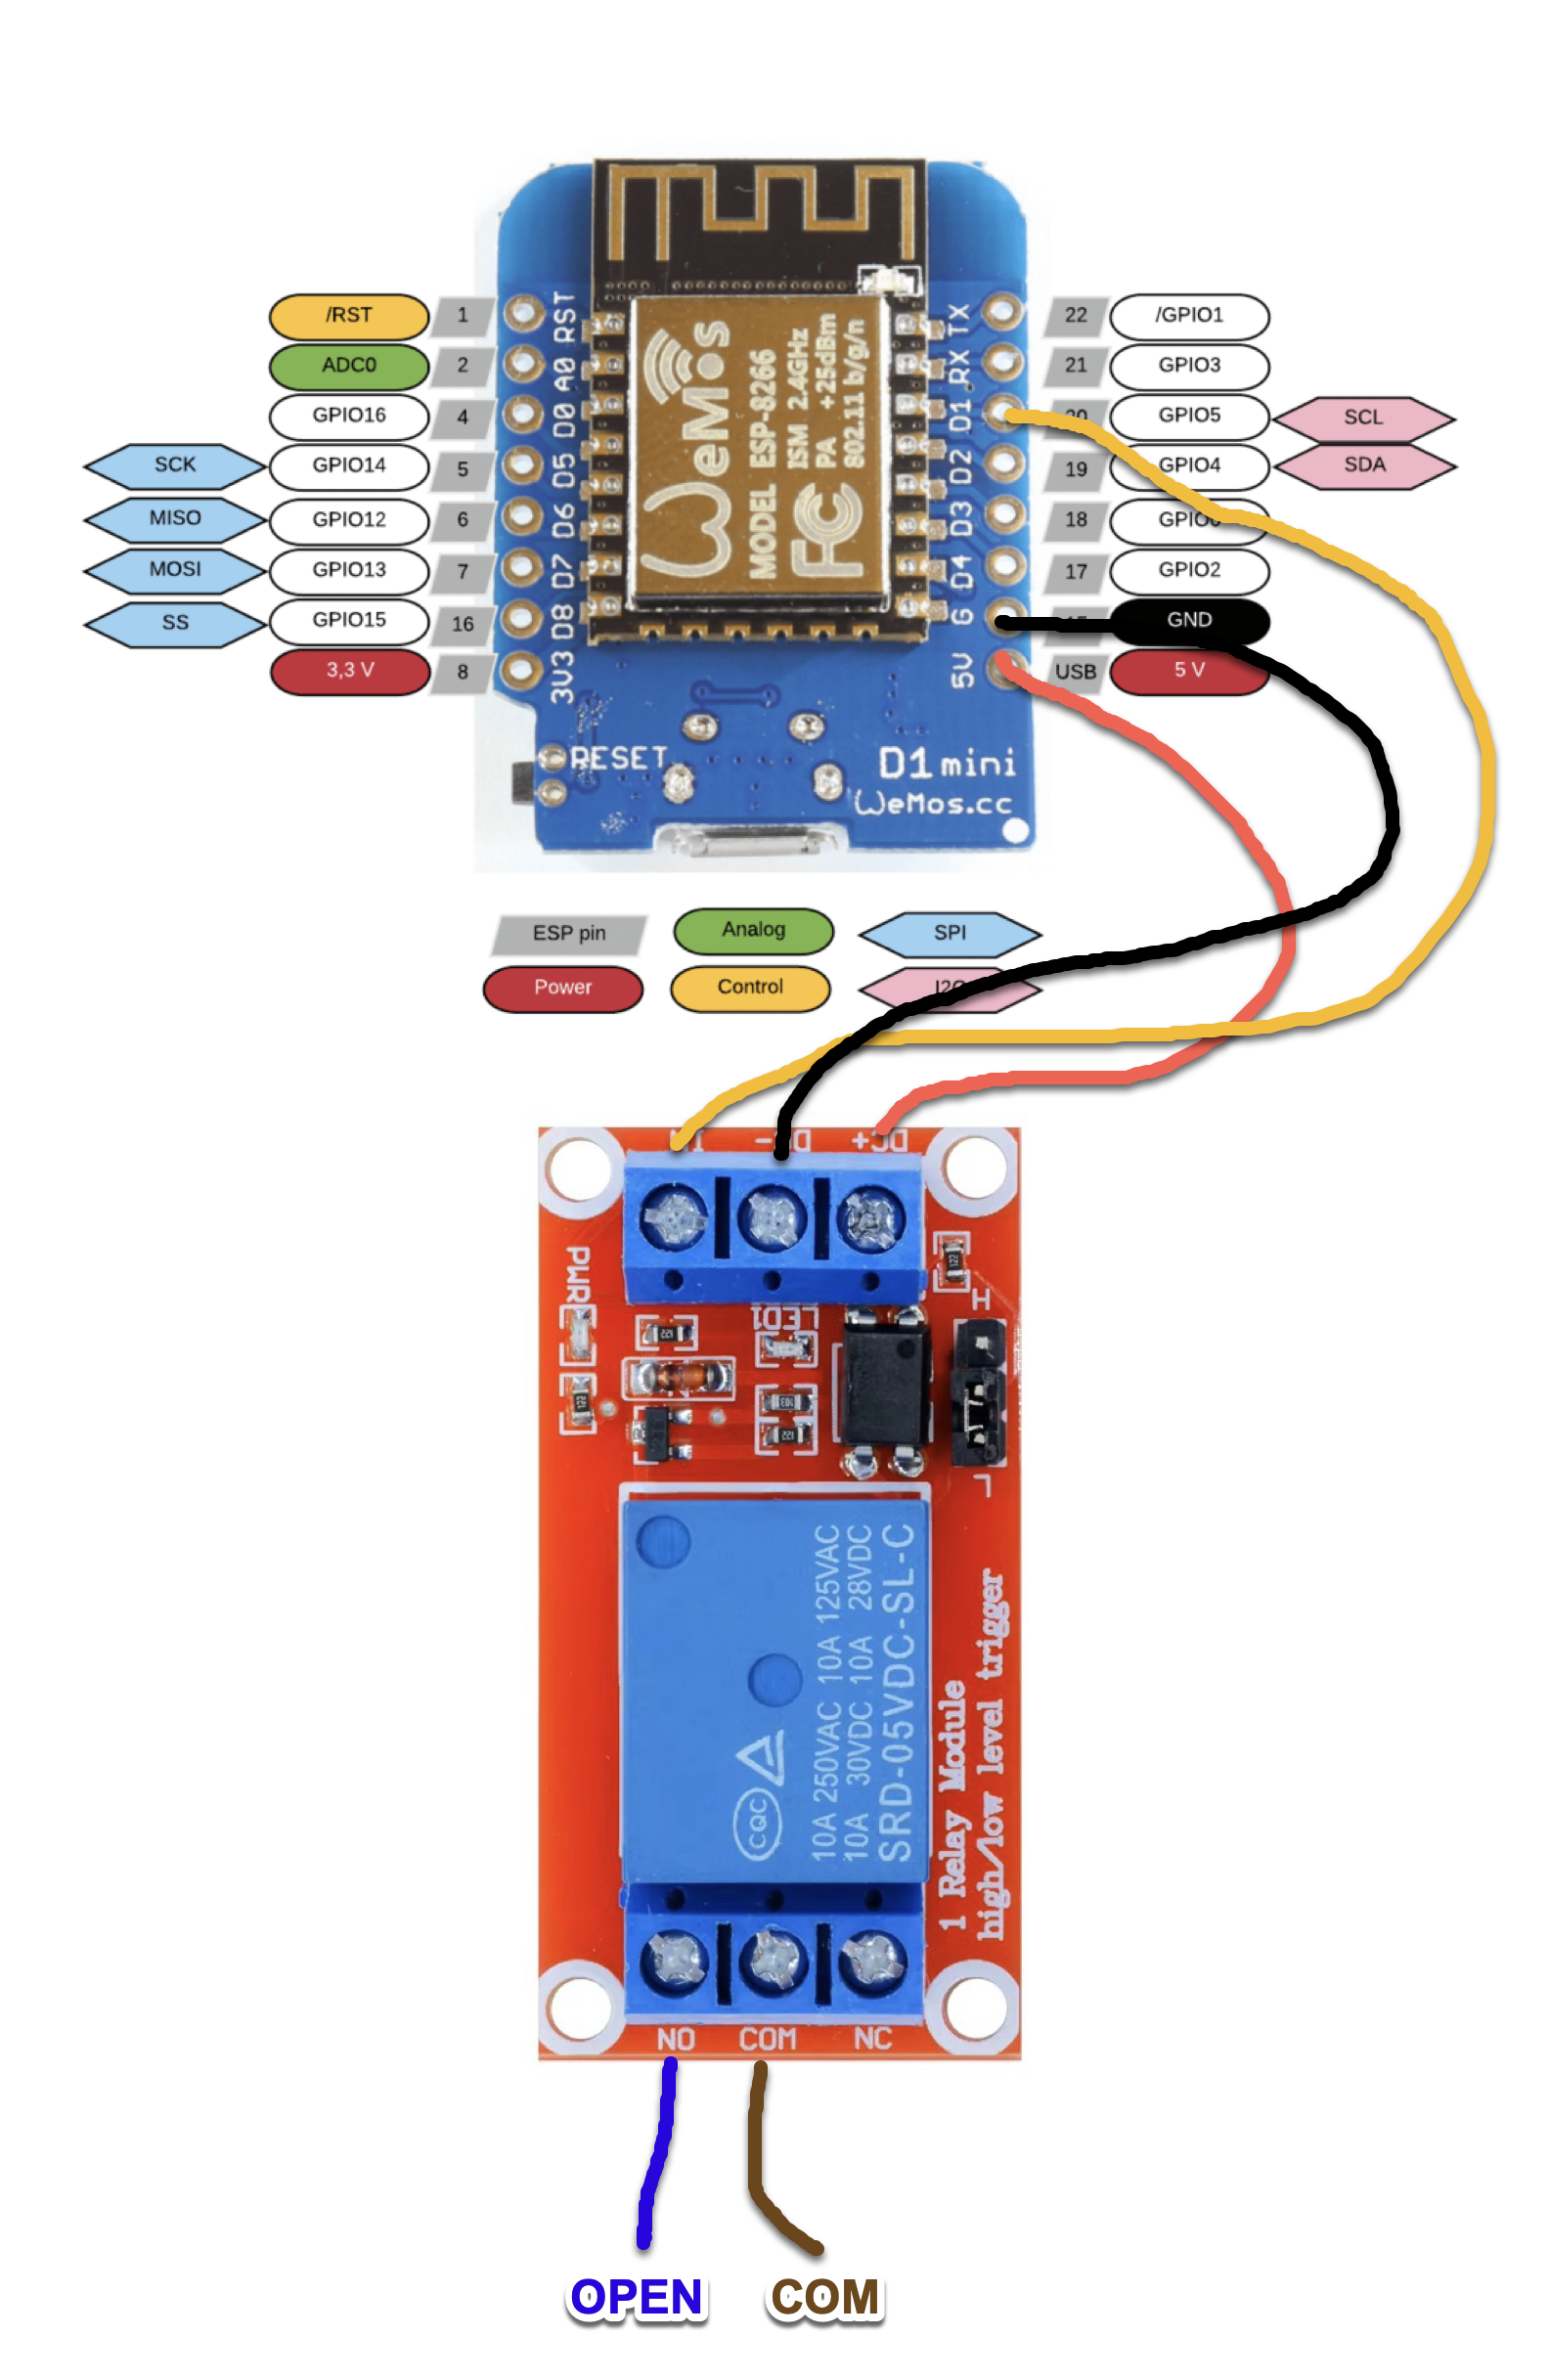
Wiring Diagram
Here's the complete wiring setup. The diagram shows how all components connect together:
┌─────────────────────────────────────────────────────────────────────┐
│                                                                     │
│                    USB 5V Power Adapter                             │
│                            │                                        │
│                            │ Micro-USB Cable                        │
│                            ▼                                        │
│                   ┌────────────────┐                                │
│                   │  WEMOS D1 MINI │                                │
│                   │   (ESP8266)    │                                │
│                   │                │                                │
│                   │  ┌──────────┐  │                                │
│    GPIO D1 (5) ───┼──┤          ├──┼─── 5V                          │
│    GND (G)     ───┼──┤  Pins    ├──┼─── GND                         │
│                   │  └──────────┘  │                                │
│                   └────┬───┬───┬───┘                                │
│                        │   │   │                                    │
│             Yellow ────┘   │   └──── Red (5V)                       │
│             (Signal)       │                                        │
│                    Black (GND)                                      │
│                            │                                        │
│                            ▼                                        │
│              ┌─────────────────────────┐                            │
│              │   1-CHANNEL RELAY       │                            │
│              │   MODULE (5V)           │                            │
│              │                         │                            │
│              │  ┌──────────────────┐   │                            │
│              │  │ Control Side     │   │                            │
│    Red    ───┼──┤ DC+              │   │                            │
│    Black  ───┼──┤ DC-              │   │                            │
│    Yellow ───┼──┤ IN               │   │                            │
│              │  └──────────────────┘   │                            │
│              │                         │                            │
│              │  ┌──────────────────┐   │                            │
│              │  │ Output Side      │   │                            │
│              │  │  NO  COM  NC     │   │                            │
│              │  │  │    │   X      │   │  (NC not used)             │
│              └──┼──┼────┼──────────┘───┘                            │
│                 │  │    │                                           │
│         Blue ───┘  │    └─── Brown                                  │
│      (to OPEN)     │      (to COM)                                  │
│                    │                                                │
│                    │                                                │
│    ┌───────────────┼──────────────────────────────┐                 │
│    │               │                              │                 │
│    │   NICE SNA20 GARAGE DOOR MOTOR               │                 │
│    │                                              │                 │
│    │   ┌──────────────────────────┐               │                 │
│    │   │  Terminal Block          │               │                 │
│    │   │                          │               │                 │
│    │   │  1   2      3      4   5 │               │                 │
│    │   │      │      │            │               │                 │
│    │   │   [OPEN]  [COM]          │               │                 │
│    │   │      │      │            │               │                 │
│    │   └──────┼──────┼────────────┘               │                 │
│    │          │      │                            │                 │
│    │      ┌───┴──┐   │                            │                 │
│    │      │ WALL │───┘  Existing wall button      │                 │
│    │      │ BTN  │      in parallel               │                 │
│    │      └──────┘                                │                 │
│    │                                              │                 │
│    └──────────────────────────────────────────────┘                 │
│                                                                     │
└─────────────────────────────────────────────────────────────────────┘
Step-by-Step Connections
Part 1: Wemos D1 Mini to Relay Module
| Wemos D1 Pin | Wire Color (suggestion) | Relay Module Pin |
|---|---|---|
| 5V | Red | DC+ |
| G (GND) | Black | DC- |
| D1 (GPIO5) | Yellow/Orange | IN |
Part 2: Relay Module to NICE SNA20
| Relay Module | Wire Gauge | NICE SNA20 Terminal |
|---|---|---|
| NO | 0.5-1.0mm² | Terminal 2 (OPEN) |
| COM | 0.5-1.0mm² | Terminal 3 (COM) |
| NC | - | [Not connected] |
Part 3: Power Supply
The Wemos D1 Mini can be powered in two ways:
- Option A: Micro-USB cable connected to a 5V USB adapter (easiest)
- Option B: If your NICE SNA20 has a 24V accessory output, use a buck converter (24V→5V) connected to the 5V and G pins
Important Notes
⚠️ Safety First:
- Disconnect power to the NICE motor before making any connections
- Double-check all connections before applying power
- The relay should be wired in parallel with the existing wall button, not replacing it
✅ Connection Tips:
- Use crimp connectors or screw terminals for solid connections
- Label all wires for future troubleshooting
- Leave some slack in the wires for maintenance
- Keep the Wemos and relay away from moving parts of the door mechanism
ESPHome Configuration
Here's the complete ESPHome configuration I used. This setup includes integration with my existing door sensor and smart logic to prevent unnecessary relay activations.
esphome:
  name: garage-door
  friendly_name: Porte Garage

esp8266:
  board: d1_mini

# Logging
logger:

# Home Assistant API
api:

# OTA Updates
ota:
  platform: esphome

# WiFi Configuration
wifi:
  ssid: !secret wifi_ssid
  password: !secret wifi_password

# Web Server (optional, for debugging)
web_server:
  port: 80

# Relay control for the garage door
switch:
  - platform: gpio
    pin: D1
    id: relay_garage
    name: "Garage Relay"
    icon: "mdi:garage-variant"
    # Automatic 500ms pulse
    on_turn_on:
      - delay: 500ms
      - switch.turn_off: relay_garage

# Import existing door sensor from Home Assistant
binary_sensor:
  - platform: homeassistant
    id: door_state_ha
    entity_id: binary_sensor.porte_du_garage_ouverture
    # Adjust logic based on your sensor:
    # If ON = closed and OFF = open, invert the lambda below

# Cover entity with real state feedback
cover:
  - platform: template
    name: "Garage Door"
    device_class: garage

    # Read actual door state from sensor
    lambda: |-
      if (id(door_state_ha).state) {
        return COVER_CLOSED;
      } else {
        return COVER_OPEN;
      }

    # Open action - only triggers if door is closed
    open_action:
      - if:
          condition:
            binary_sensor.is_on: door_state_ha
          then:
            - logger.log: "Opening garage door..."
            - switch.turn_on: relay_garage
          else:
            - logger.log: "Door already open, ignoring command"

    # Close action - only triggers if door is open
    close_action:
      - if:
          condition:
            binary_sensor.is_off: door_state_ha
          then:
            - logger.log: "Closing garage door..."
            - switch.turn_on: relay_garage
          else:
            - logger.log: "Door already closed, ignoring command"

    # Stop action (triggers relay during movement)
    stop_action:
      - switch.turn_on: relay_garage
Key Configuration Features
Sensor Integration: The configuration imports my existing binary_sensor.porte_du_garage_ouverture from Home Assistant. This means the ESPHome device doesn't need its own physical sensor - it uses what's already in place.
Smart Logic: The open/close actions include conditional checks to prevent unnecessary relay activations. If you try to open an already-open door, it logs a message and does nothing. This extends relay life and prevents accidental double-triggers.
Configurable Pulse Duration: The 500ms delay works perfectly for the NICE SNA20. If your motor requires a longer or shorter pulse, simply adjust the delay value.
Installation Process
Step 1: Flash the Wemos D1 Mini
- Connect the Wemos to your computer via USB
- In Home Assistant, go to Settings → Add-ons → ESPHome
- Click + NEW DEVICE
- Name it
garage-doorand select ESP8266 - Paste the configuration above
- Update WiFi credentials in your
secrets.yaml - Click INSTALL → Plug into this computer
- Select the COM port and wait for the flash to complete (~2-3 minutes)
Step 2: Wire the Hardware
- Power off everything before making connections
- Connect the Wemos to the relay module as shown in the wiring diagram
- Connect the relay to the NICE motor terminals (in parallel with the button)
- Apply power to the Wemos (via USB or 5V supply)
Step 3: Test the Relay
- In Home Assistant, go to Developer Tools → States
- Find
switch.garage_relay - Toggle the switch
- You should hear the relay click
- It should automatically turn off after 500ms
Step 4: Test the Door
- Ensure your existing door sensor is working in Home Assistant
- Find the
cover.garage_doorentity - Press OPEN - the relay should click and the door should move
- The entity should show the real door state (from your sensor)
- Test CLOSE to verify it works in both directions
Advantages of This Solution
1. True State Feedback
Unlike "optimistic" covers that assume commands succeed, this setup uses an actual sensor to report door position. You always know if the door is truly open or closed.
2. Prevents Unnecessary Operations
The conditional logic prevents the relay from firing if the door is already in the desired state. This is particularly useful for automations that might trigger repeatedly.
3. Local Control
Everything runs locally - no cloud dependency. Even if your internet goes down, you can still control your garage door through Home Assistant.
4. OTA Updates
After the initial USB flash, all future updates can be done wirelessly. No need to climb a ladder and reconnect cables.
5. Low Power Consumption
The Wemos D1 Mini draws minimal power (typically under 100mA), making it suitable for continuous operation.
6. Logging and Debugging
The web server and logger provide excellent debugging capabilities. You can access http://192.168.200.189 to see real-time logs.
Home Assistant Dashboard
I use Mushroom cards for my dashboards. Here's a simple card configuration:
type: custom:mushroom-cover-card
entity: cover.garage_door
show_position_control: false
name: Garage Door
This gives you a clean, material-design card with open/close/stop buttons.
Lessons Learned
What Went Well
- The ESPHome approach is incredibly flexible and well-documented
- Using an existing sensor saved time and money
- The conditional logic prevents a lot of edge-case issues
What I'd Do Differently
- I initially forgot to check the sensor logic direction, which caused the open/close buttons to be reversed
- Testing with a breadboard first would have saved some troubleshooting time

End of this project
Integrating the NICE SNA20 garage door with Home Assistant using ESPHome was a rewarding weekend project that significantly enhanced my smart home. For less than €10 and a few hours of work, I gained:
- Remote control from anywhere
- Real-time door status monitoring
- Complete local control with no cloud dependencies
- A foundation for future home automation projects
The ESPHome + Wemos D1 Mini combination continues to impress me with its reliability and flexibility. If you're comfortable with basic electronics and have Home Assistant running, I highly recommend this approach for adding smart garage door control.
Whether you're looking to integrate your garage door into your smart home or simply want the convenience of checking if you closed it from bed, this solution delivers excellent results at minimal cost.