
Running macOS as a virtual machine on Proxmox has become increasingly popular for developers and IT professionals who need access to macOS environments without dedicated Apple hardware. With Proxmox 8.4 and later versions, the installation process has evolved due to changes in how ISO files are handled. This guide provides a streamlined approach to installing macOS Tahoma on Proxmox 9.0.6+.
This guide is based on the excellent work by Frank Neugebauer: macOS Sequoia als VM auf Proxmox 9.0.6 nutzen
Prerequisites
On Proxmox Server:
- Proxmox VE 9.0.6 or newer
- Sufficient storage space (minimum 100GB recommended)
- Intel CPU (AMD works but requires different configuration)
- Root SSH access or shell access
- Internet connection
No Mac required - everything can be done directly on Proxmox!
Installation Process
Step 1: Install Required Tools on Proxmox
# Update system and install dependencies
apt update
apt install -y python3-requests dmg2img parted wget unzip
Step 2: Download macOS Recovery Image
Download the official recovery image directly from Apple's servers:
# Download the fetch-macOS script
cd /root
wget https://raw.githubusercontent.com/kholia/OSX-KVM/master/fetch-macOS-v2.py

# Run the script
python3 fetch-macOS-v2.py
The script will display available macOS versions. Select macOS Tahoma (the latest development version). The script will download BaseSystem.dmg automatically.
Step 3: Convert BaseSystem to RAW Format
# Convert DMG to RAW format
dmg2img /root/BaseSystem.dmg /root/BaseSystem-installer.raw
Step 4: Create the VM
Set your variables and create the VM shell:
# Configure variables (adjust to your environment)
VMID=200
NAME="macOS-Tahoma"
STORAGE="Datastore"  # Change to your storage pool name (local-zfs, Datastore, etc.)

# Create VM
qm create $VMID --name $NAME --memory 12288 --cores 4 --sockets 1 --cpu host

# Enable UEFI and create EFI disk
qm set $VMID --bios ovmf
qm set $VMID --efidisk0 $STORAGE:1,pre-enrolled-keys=1

# Set machine type and graphics
qm set $VMID --machine q35
qm set $VMID --vga qxl

# Configure network
qm set $VMID --net0 vmxnet3,bridge=vmbr0

# Create target disk for macOS installation (100GB)
qm set $VMID --sata2 $STORAGE:100
Step 5: Create OpenCore Boot Disk
OpenCore is the bootloader that makes macOS think it's running on Apple hardware:
# Download and extract OpenCore EFI
cd /root
wget -O OpenCoreEFIFolder.zip \
  "https://github.com/thenickdude/KVM-Opencore/releases/download/v21/OpenCoreEFIFolder-v21.zip"
unzip -o OpenCoreEFIFolder.zip -d OpenCore

# Create 512MB qcow2 disk
qemu-img create -f qcow2 bootdisk.qcow2 512M

# Mount as Network Block Device
modprobe nbd max_part=8
qemu-nbd -c /dev/nbd0 bootdisk.qcow2

# Create GPT partition table and EFI partition
parted -s /dev/nbd0 mklabel gpt
parted -s /dev/nbd0 mkpart EFI fat32 1MiB 300MiB
parted -s /dev/nbd0 set 1 esp on
mkfs.vfat -F32 /dev/nbd0p1

# Mount and copy EFI folder
mkdir -p /mnt/efi
mount /dev/nbd0p1 /mnt/efi
cp -r /root/OpenCore/EFI /mnt/efi/

# Unmount and disconnect
umount /mnt/efi
qemu-nbd -d /dev/nbd0
Step 6: Import Disks to VM
# Import OpenCore boot disk
qm importdisk $VMID /root/bootdisk.qcow2 $STORAGE

# Import macOS installer disk
qm importdisk $VMID /root/BaseSystem-installer.raw $STORAGE --format raw

# Check for unused disks
cat /etc/pve/qemu-server/$VMID.conf | grep unused
You should see two unused disks listed (unused0 and unused1).
Step 7: Attach Disks and Configure Boot Order
Identify which unused disk is which (check the sizes - OpenCore is ~512MB, BaseSystem is ~2.5GB):
# List the disks to identify them
qm config $VMID | grep -E "sata|unused"
Then attach them (replace X and Y with your actual disk numbers from the unused output):
# Attach OpenCore as SATA0 (the 512MB disk)
qm set $VMID --sata0 $STORAGE:$VMID/vm-$VMID-disk-X.raw

# Attach installer as SATA1 (the 2.5GB disk)
qm set $VMID --sata1 $STORAGE:$VMID/vm-$VMID-disk-Y.raw

# Set boot order (IMPORTANT: must include all three disks)
qm set $VMID --boot "order=sata0;sata1;sata2"
Verify your configuration:
qm config $VMID | grep -E "sata|boot"
You should see:
- sata0: OpenCore boot disk (~512MB)
- sata1: macOS installer (~2.5GB)
- sata2: Target installation disk (100GB)
- boot: order=sata0;sata1;sata2
Step 8: Add Required VM Arguments
Edit the VM configuration file:
nano /etc/pve/qemu-server/$VMID.conf
Add this line at the end of the file:
For Intel CPUs:
args: -device isa-applesmc,osk="ourhardworkbythesewordsguardedpleasedontsteal(c)AppleComputerInc" -smbios type=2 -device qemu-xhci -device usb-kbd -device usb-tablet -global nec-usb-xhci.msi=off -global ICH9-LPC.acpi-pci-hotplug-with-bridge-support=off -cpu host,vendor=GenuineIntel,+invtsc,+hypervisor,kvm=on,vmware-cpuid-freq=on
For AMD CPUs:
args: -device isa-applesmc,osk="ourhardworkbythesewordsguardedpleasedontsteal(c)AppleComputerInc" -smbios type=2 -device qemu-xhci -device usb-kbd -device usb-tablet -global nec-usb-xhci.msi=off -global ICH9-LPC.acpi-pci-hotplug-with-bridge-support=off -cpu Haswell-noTSX,vendor=GenuineIntel,+invtsc,+hypervisor,kvm=on,vmware-cpuid-freq=on
Save and exit (Ctrl+X, Y, Enter).
Installing macOS
Step 9: Start the VM and Begin Installation
- In the Proxmox web interface, select your VM
- Open the Console
- Click Start
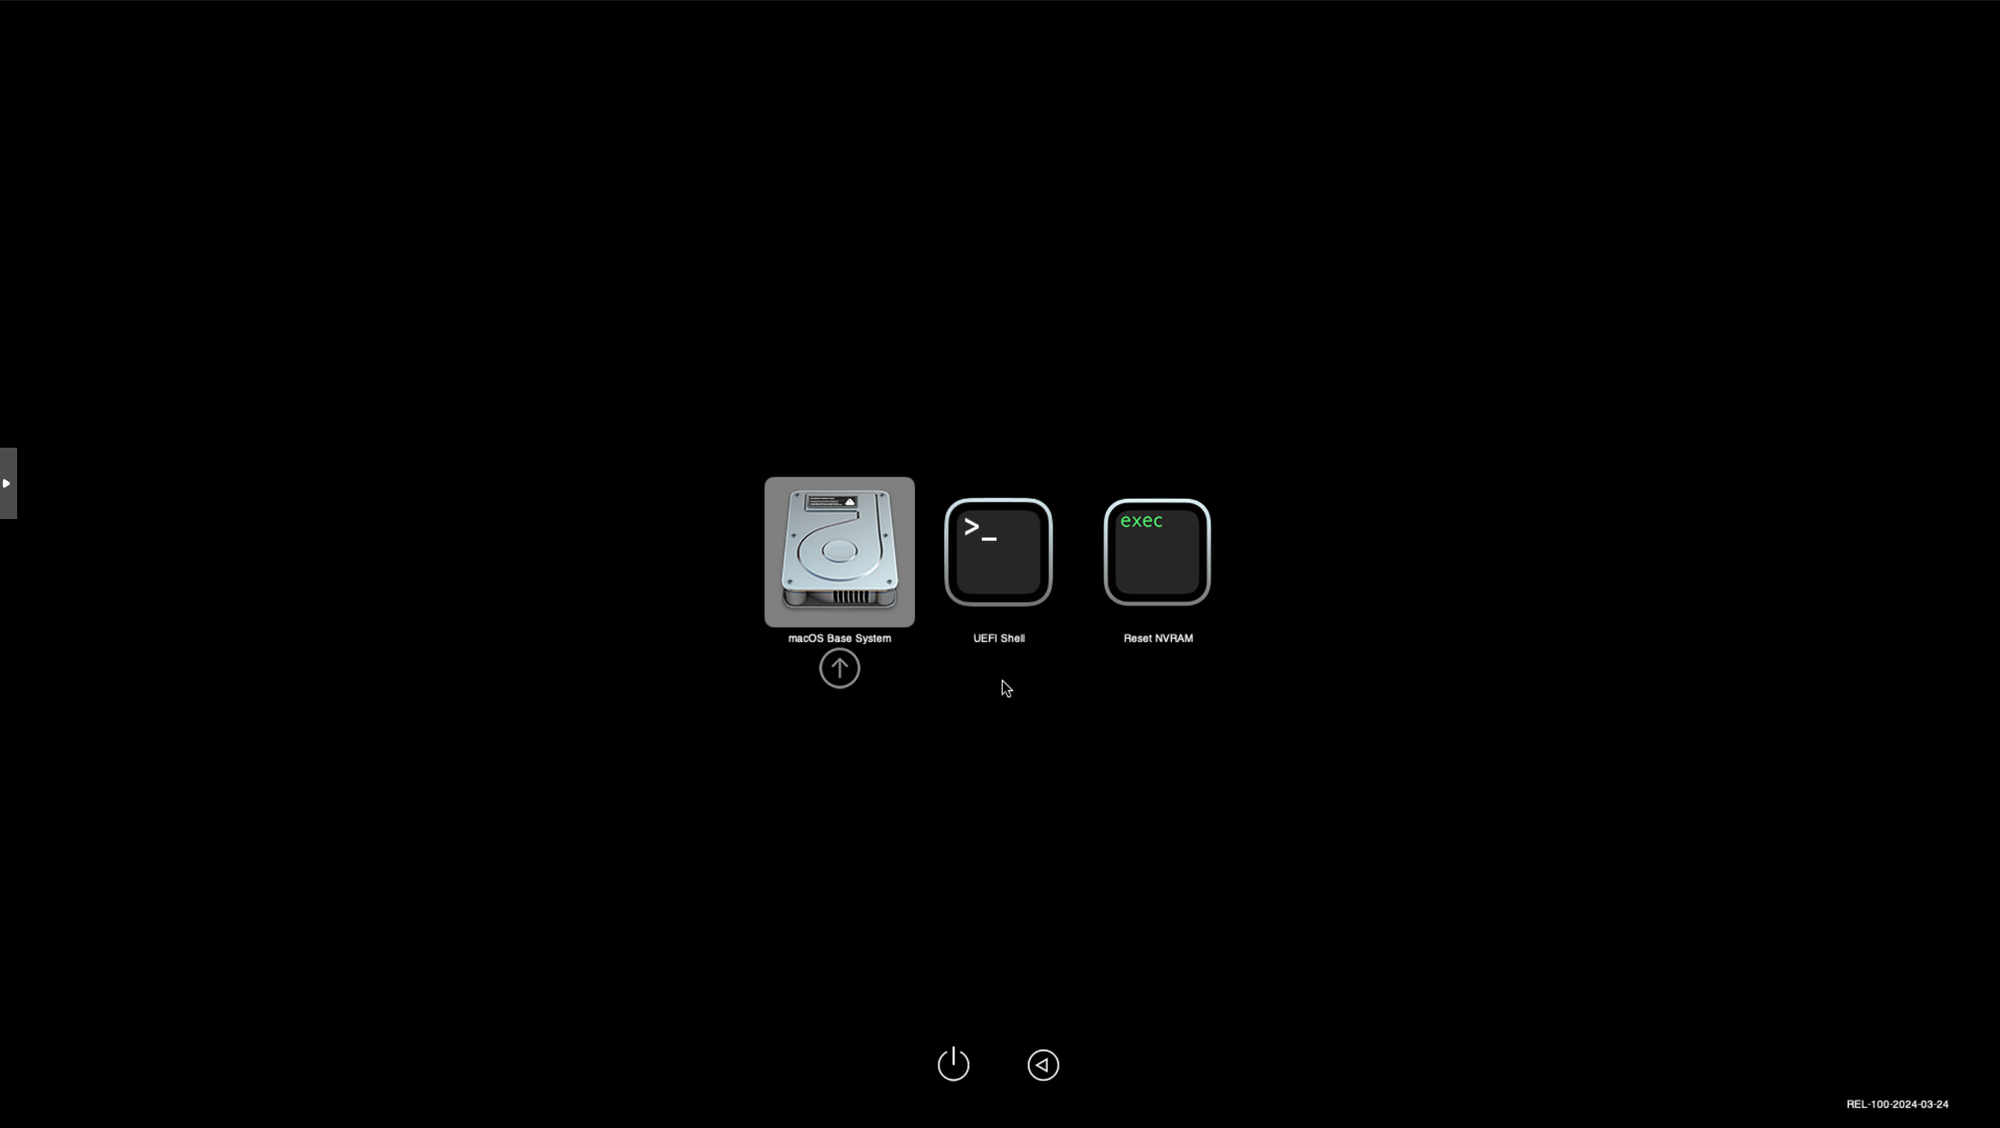
You should see the OpenCore boot menu with "macOS Base System" option.
Step 10: Format the Target Disk
- Select "macOS Base System" in OpenCore and press Enter
- When the recovery environment loads, select Disk Utility
- Click View → Show All Devices
- Select the 100GB disk (the largest one, not the smaller installer disk)
- Click Erase button with these settings:
- Name: Macintosh HD (or your preference)
- Format: APFS
- Scheme: GUID Partition Map
- Click Erase and wait for completion
- Close Disk Utility
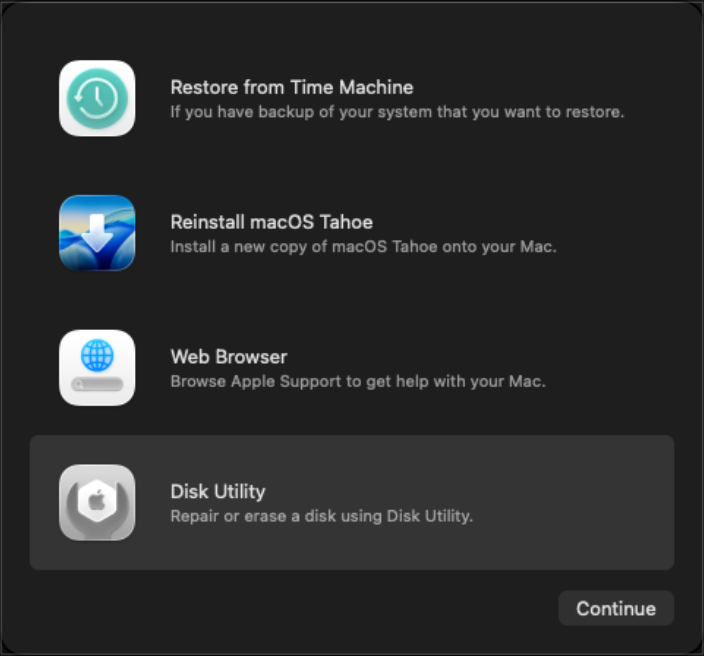
Step 11: Install macOS
- From the main recovery menu, select "Install macOS Tahoma"
- Click Continue and accept the license agreement
- Select Macintosh HD as the installation destination
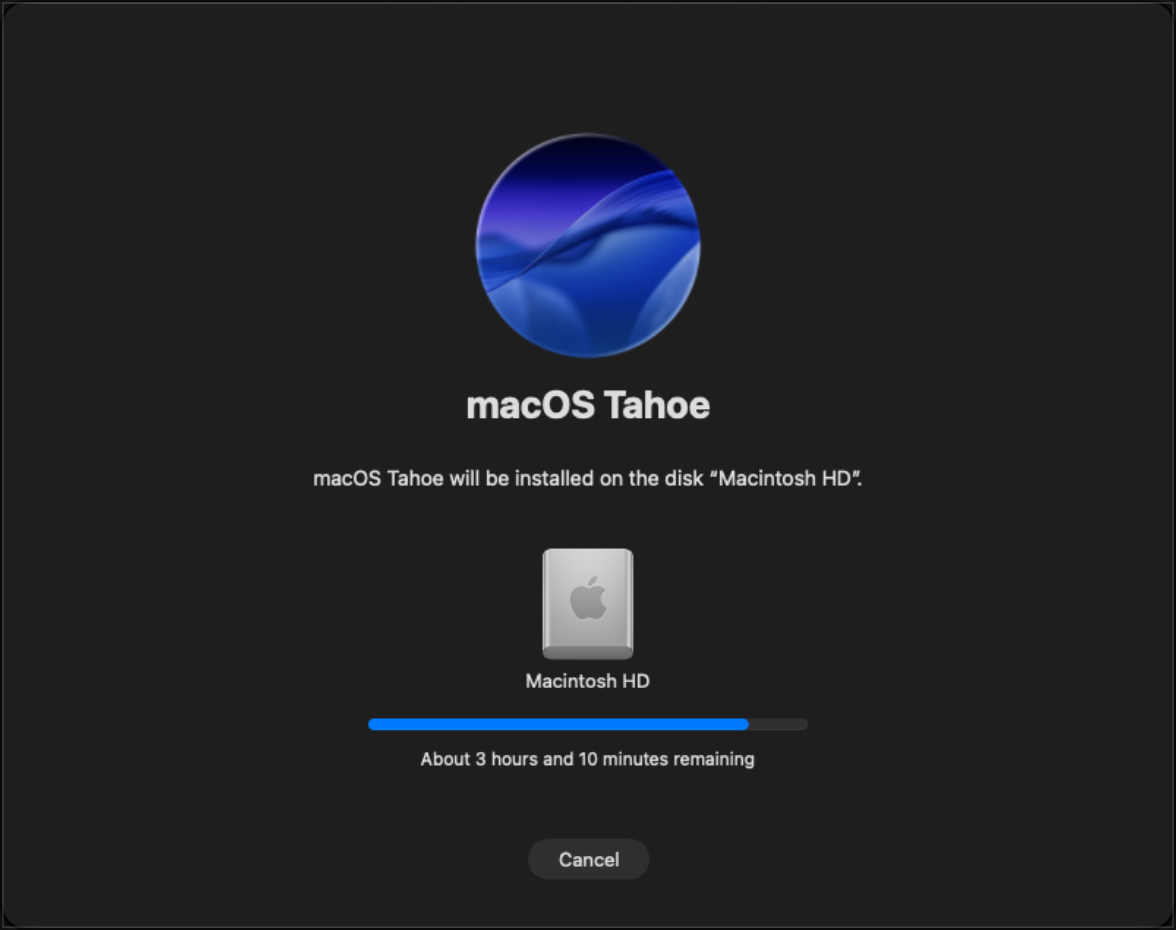
- Click Install and wait
The VM will restart several times automatically during installation.
Important Boot Selection During Installation:
- First few restarts: In OpenCore, select "macOS Installer" (this continues the installation)
- After final restart: Select "Macintosh HD" (this boots into your installed system)
The complete installation typically takes 20-45 minutes depending on your hardware.
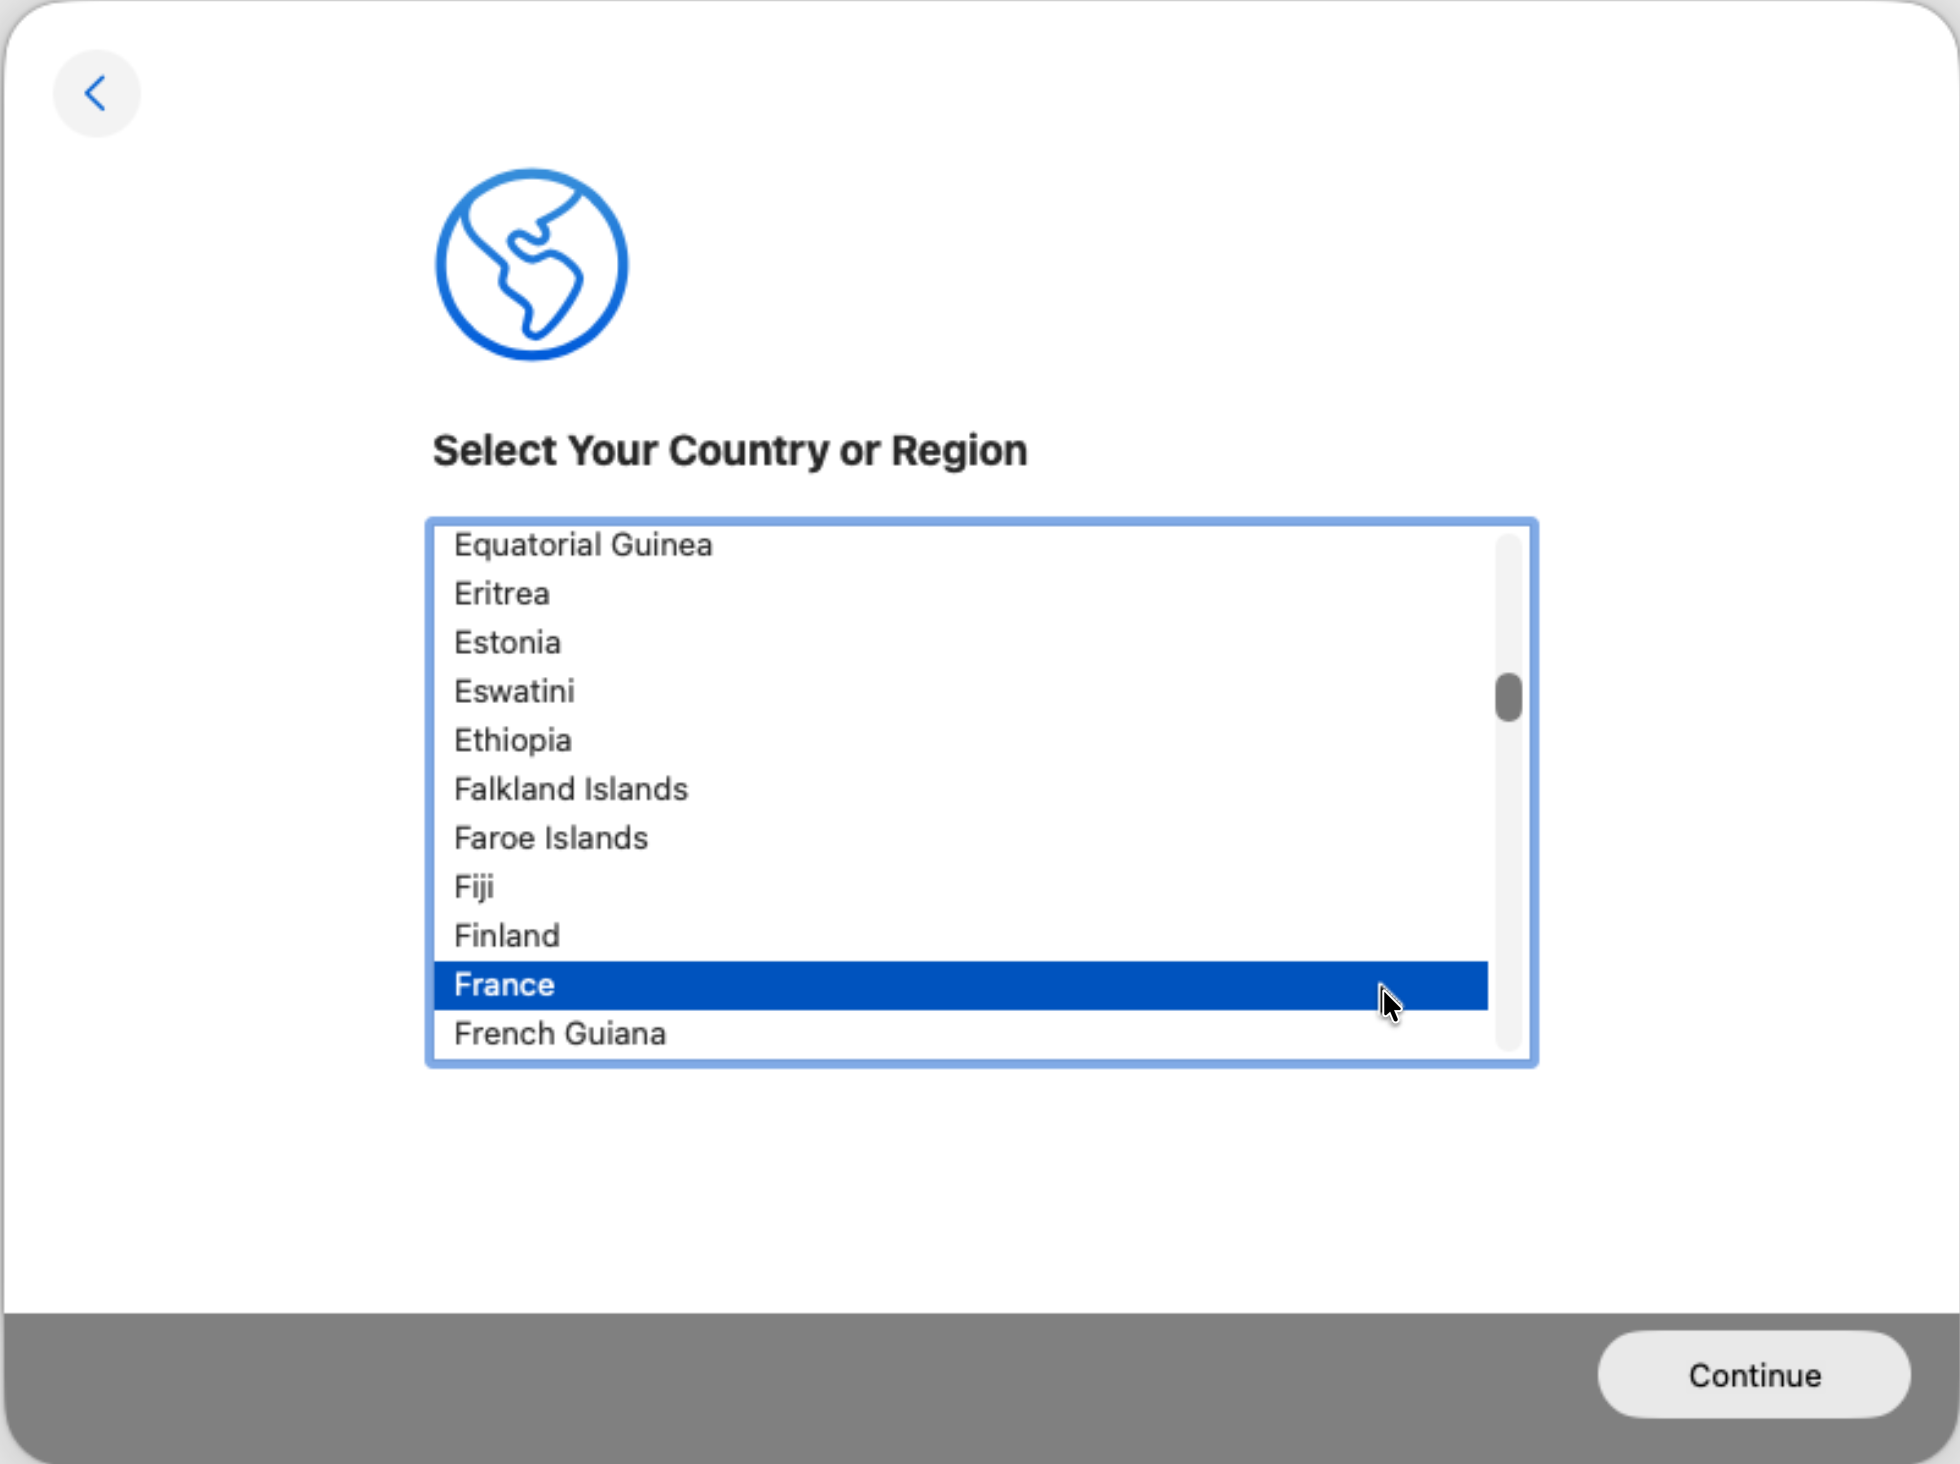
Step 12: Complete macOS Setup
After installation completes and you boot into Macintosh HD:
- Select your country/region and language
- Configure accessibility options (if needed)
- Set up Wi-Fi/Network (the VM should get an IP via DHCP)
- Skip or complete Data & Privacy
- Create your user account
- Configure remaining setup preferences
Congratulations! You now have macOS Tahoma running on Proxmox!
Post-Installation Optimization
Clean Up Installer Disk
Once installation is complete and macOS boots successfully, remove the installer disk to free up space:
qm set $VMID --delete sata1
Adjust VM Resources
Optimize based on your needs:
# Increase memory to 16GB
qm set $VMID --memory 16384

# Add more CPU cores
qm set $VMID --cores 6

# Stop and start VM for changes to take effect
qm stop $VMID
qm start $VMID
Install QEMU Guest Agent (Highly Recommended)
The QEMU Guest Agent allows Proxmox to communicate with your macOS VM for better management and monitoring. This enables features like:
- Viewing the VM's IP address in Proxmox UI
- Proper shutdown/reboot commands
- Clean filesystem snapshots (freeze/thaw)
- Getting VM information and status
Step 1: Install Homebrew in macOS
First, you need to install Homebrew, the package manager for macOS. Open Terminal in your macOS VM:
# Install Homebrew
/bin/bash -c "$(curl -fsSL https://raw.githubusercontent.com/Homebrew/install/HEAD/install.sh)"
Follow the on-screen instructions. You'll be asked for your user password and to confirm installation of Command Line Tools.
After installation completes, add Homebrew to your PATH:
# For Intel Macs (your case)
echo 'eval "$(/usr/local/bin/brew shellenv)"' >> ~/.zprofile
eval "$(/usr/local/bin/brew shellenv)"

# Verify installation
brew --version
Step 2: Install QEMU Guest Agent
# Install QEMU (includes qemu-ga)
brew install qemu
Step 3: Configure Guest Agent as a Service
Create a launch daemon to run the guest agent automatically:
# Create the service file
sudo tee /Library/LaunchDaemons/org.qemu.guest-agent.plist << 'EOF'
<?xml version="1.0" encoding="UTF-8"?>
<!DOCTYPE plist PUBLIC "-//Apple//DTD PLIST 1.0//EN" "http://www.apple.com/DTDs/PropertyList-1.0.dtd">
<plist version="1.0">
<dict>
    <key>Label</key>
    <string>org.qemu.guest-agent</string>
    <key>ProgramArguments</key>
    <array>
        <string>/usr/local/bin/qemu-ga</string>
    </array>
    <key>RunAtLoad</key>
    <true/>
    <key>KeepAlive</key>
    <true/>
</dict>
</plist>
EOF

# Load and start the service
sudo launchctl load /Library/LaunchDaemons/org.qemu.guest-agent.plist

# Verify it's running
ps aux | grep qemu-ga
Step 4: Enable Guest Agent in Proxmox
On your Proxmox server:
# Enable the agent for the VM
qm set $VMID --agent enabled=1

# Reboot the VM
qm reboot $VMID
Step 5: Verify Guest Agent is Working
After the VM reboots, test the connection:
# Test communication
qm agent $VMID ping

# Get network interfaces and IP addresses
qm agent $VMID network-get-interfaces

# Get OS information
qm agent $VMID get-osinfo
If everything is working, you should see JSON responses with the VM information. The VM's IP address will now be visible in the Proxmox web interface under the VM's Summary tab!
Enable Screen Sharing (Recommended)
For better remote access from another Mac:
- In macOS: System Settings → General → Sharing
- Enable Screen Sharing
- Note the VM's IP address (visible in Network settings)
- From another Mac: Finder → Go → Connect to Server (⌘K)
- Enter:
vnc://VM_IP_ADDRESS
You can now control your macOS Tahoma VM from any Mac on your network!
Performance Tips
- CPU: The
hostCPU type provides best performance by passing through your actual CPU features - Memory: Allocate at least 12GB; 16GB is ideal for smooth operation
- Display: Consider changing VGA from
qxltoVMware compatiblefor better graphics performance - Network: The
vmxnet3driver provides excellent performance for network operations - Storage: If you have SSD storage, ensure your VM disk is placed on it for faster performance
Maintenance
Keeping macOS Updated
macOS Tahoma can be updated through the standard Software Update mechanism:
- System Settings → General → Software Update
- Install updates as they become available
- The VM will restart as needed during updates
Snapshot Before Major Changes
Always create a snapshot before major updates or configuration changes:
qm snapshot $VMID before-update --description "Before macOS update to X.Y"
Restore if needed:
qm rollback $VMID before-update
You now have a fully functional macOS Tahoma virtual machine running on Proxmox! This setup provides a powerful platform for development, testing, and learning without requiring dedicated Apple hardware.
Credits and Resources
Special thanks to:
- Frank Neugebauer for the original German guide that inspired this tutorial
- Nick Dude for the OpenCore bootloader configuration for KVM
- Foxlet/kholia for the OSX-KVM project and fetch-macOS script


