Proxmox Backup Server (PBS) is a powerful enterprise-grade backup solution that uses deduplication, compression and encryption to efficiently store backups. PBS 4.x, the latest major version, is built on Debian Trixie and offers improved performance and features.
Running PBS in a TrueNAS SCALE container offers several advantages:
- Lightweight: Containers use far fewer resources than VMs
- Native ZFS Integration: Direct access to TrueNAS's ZFS storage without overhead
- Simplified Management: Manage backups alongside your storage infrastructure, access via TrueNAS IP using Incus proxy device
- Cost Effective: No need for dedicated backup server hardware
This guide will walk you through installing PBS in TrueNAS SCALE 25.10's experimental container feature, which uses Incus (the community fork of LXD).
Architecture Overview
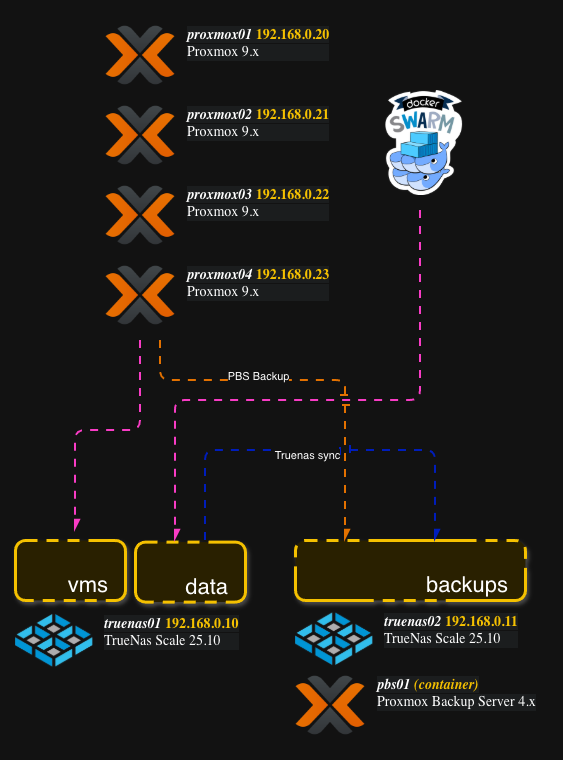
In my setup, I'm running PBS on a secondary TrueNAS server to back up a primary TrueNAS and its hosted VMs. This provides:
- Hardware separation (no single point of failure)
- PBS pulls backups over NFS from the primary TrueNAS
- PBS stores deduplicated backups on the secondary TrueNAS's local ZFS
- Professional backup infrastructure without additional hardware costs
Prerequisites
Before starting, ensure you have:
- TrueNAS SCALE 25.10 installed and running
- Sufficient storage for your backups (plan for at least 2x your data size initially, though deduplication will reduce this)
- Network connectivity to the systems you'll be backing up
- SSH access to your TrueNAS server
- Basic familiarity with Linux command line
Debian Version for PBS 4.x:
- Debian 13 "Trixie": Recommended - This is the supported and recommended version for Proxmox Backup Server 4.x
- Debian 12 "Bookworm": Compatible but older - Works with PBS 3.x
This guide uses Debian Trixie as it's the current recommended platform for PBS 4.x.
Step 1: Enable Container Support in TrueNAS
TrueNAS SCALE 25.10 includes experimental container support. Let's verify it's available:
1. Log into TrueNAS Web Interface
Navigate to https://your-truenas-ip and log in with admin credentials.
2. Access the Containers Section
Go to Virtualization → Containers (marked as "Experimental")
3. Verify Incus is Available
SSH into your TrueNAS server and verify Incus is installed:
sudo incus version
You should see version information. If not, the container feature may not be fully initialized.
Step 2: Create a Debian Container for PBS
PBS 4.x runs best on Debian Trixie (Debian 13), which is the officially supported and recommended platform.
1. In your SSH session, create the container:
# Launch a Debian Trixie container (recommended for PBS 4.x)
sudo incus launch images:debian/trixie PBS01

# Wait a few seconds for it to start, then verify
sudo incus list
You should see PBS01 in the RUNNING state.
2. Verify network connectivity:
# Enter the container
sudo incus exec PBS01 -- bash

# Test network
ping -c 3 8.8.8.8
exit
If ping fails, you may need to configure networking, but this usually works out of the box.
Step 3: Prepare the Container
Before installing PBS, we need to update the system and install prerequisites.
1. Enter the container:
sudo incus exec PBS01 -- bash
2. Update the system:
apt update
apt upgrade -y
3. Install required packages:
apt install -y wget gnupg2 curl sudo
4. Set a static hostname (optional but recommended):
hostnamectl set-hostname pbs01
echo "127.0.1.1 pbs01" >> /etc/hosts
Step 4: Install Proxmox Backup Server
Now we'll install PBS 4.x using a streamlined script. This approach is based on the excellent guide at wiki.serversatho.me/pbs.
1. Make sure you're inside the container:
sudo incus exec PBS01 -- bash
2. Run the installation script:
# Add Proxmox repository
echo "deb http://download.proxmox.com/debian/pbs trixie pbs-no-subscription" | sudo tee -a /etc/apt/sources.list

# Install wget and download GPG key
sudo apt install wget -y
wget https://enterprise.proxmox.com/debian/proxmox-release-trixie.gpg -O /etc/apt/trusted.gpg.d/proxmox-release-trixie.gpg

# Update and upgrade system
sudo apt update && apt upgrade -y

# Install useful packages (including nfs-common for NFS mounting if needed)
sudo apt install -y whiptail apt-utils coreutils bash proxmox-widget-toolkit nano nfs-common cron

# Install Proxmox Backup Server
sudo apt update && apt install proxmox-backup-server -y

# Display the access URL
echo "Access PBS at: https://$(ip -4 addr show $(ip route | grep default | awk '{print $5}') | grep inet | awk '{print $2}' | cut -d/ -f1):8007"

# Set root password
passwd root
What this does:
- Adds the PBS repository to your sources
- Installs essential packages including:
nfs-common- Needed if you'll mount NFS shares (see the companion storage blog)proxmox-widget-toolkit- PBS web interface componentswhiptail,nano,cron- Useful utilities
- Installs PBS 4.x
- Automatically displays the container's access URL
- Prompts you to set a root password
3. Verify the installation:
systemctl status proxmox-backup

# Check the installed version
proxmox-backup-manager versions
You should see PBS 4.x installed and the service active and running.
4. Exit the container:
exit
Note: The script installs nfs-common which will be useful if you later need to mount NFS shares inside the container (see the companion blog post on storage configuration).
Step 5: Configure Port Forwarding for Easy Access
To access the PBS web interface easily, we'll use Incus's built-in proxy feature to map port 8007 from the TrueNAS host to the container. This is much simpler than setting up nginx reverse proxy and allows you to access PBS using your TrueNAS IP address.
Add the port proxy:
# On TrueNAS host, add a proxy device to forward port 8007
sudo incus config device add PBS01 proxy8007 proxy \
    listen=tcp:0.0.0.0:8007 \
    connect=tcp:127.0.0.1:8007

# Verify it was added
sudo incus config device show PBS01
You should see output like:
proxy8007:
  connect: tcp:127.0.0.1:8007
  listen: tcp:0.0.0.0:8007
  type: proxy
What this does:
- Maps port 8007 on the TrueNAS host (0.0.0.0:8007) to port 8007 in the container
- No nginx configuration needed
- No need to find the container IP
- Simply use your TrueNAS IP address
Alternative: Using TrueNAS GUI (if available)
As of today TrueNAS offer a GUI option for container proxies:
- Go to Virtualization → Containers
- Click on PBS01
- Look for Proxies section
- Add:
8007 TCP (Host) → 8007 TCP (Container)

Access PBS Web Interface:
Now you can access PBS at:
https://<truenas-ip>:8007
For example: https://192.168.0.20:8007
This is much easier because:
- ✅ You already know your TrueNAS IP
- ✅ No need to find the container IP every time
- ✅ Container IP can change - TrueNAS IP typically doesn't
- ✅ Simpler to bookmark in your browser
- ✅ No complex nginx configuration required
Alternative: Direct Container Access
If you prefer to access the container directly (or if you need the container IP for troubleshooting):
1. Find the container's IP address:
sudo incus exec PBS01 -- bash
ip addr show eth0 | grep inet
exit
Note the IP address (e.g., 10.121.29.3).
2. Access directly:
Navigate to: https://<container-ip>:8007
For example: https://10.121.29.3:8007
You'll get a certificate warning (self-signed certificate) - accept it to proceed.
Step 6: Access PBS Web Interface
The installation script already prompted you to set a root password during Step 4. Now let's access PBS.
Open a web browser and navigate to:
https://<truenas-ip>:8007
(Or https://<container-ip>:8007 if you didn't set up the proxy device)
You'll get a certificate warning (self-signed certificate) - accept it to proceed.
Log in with:
- Username:
root - Password: The password you set during installation
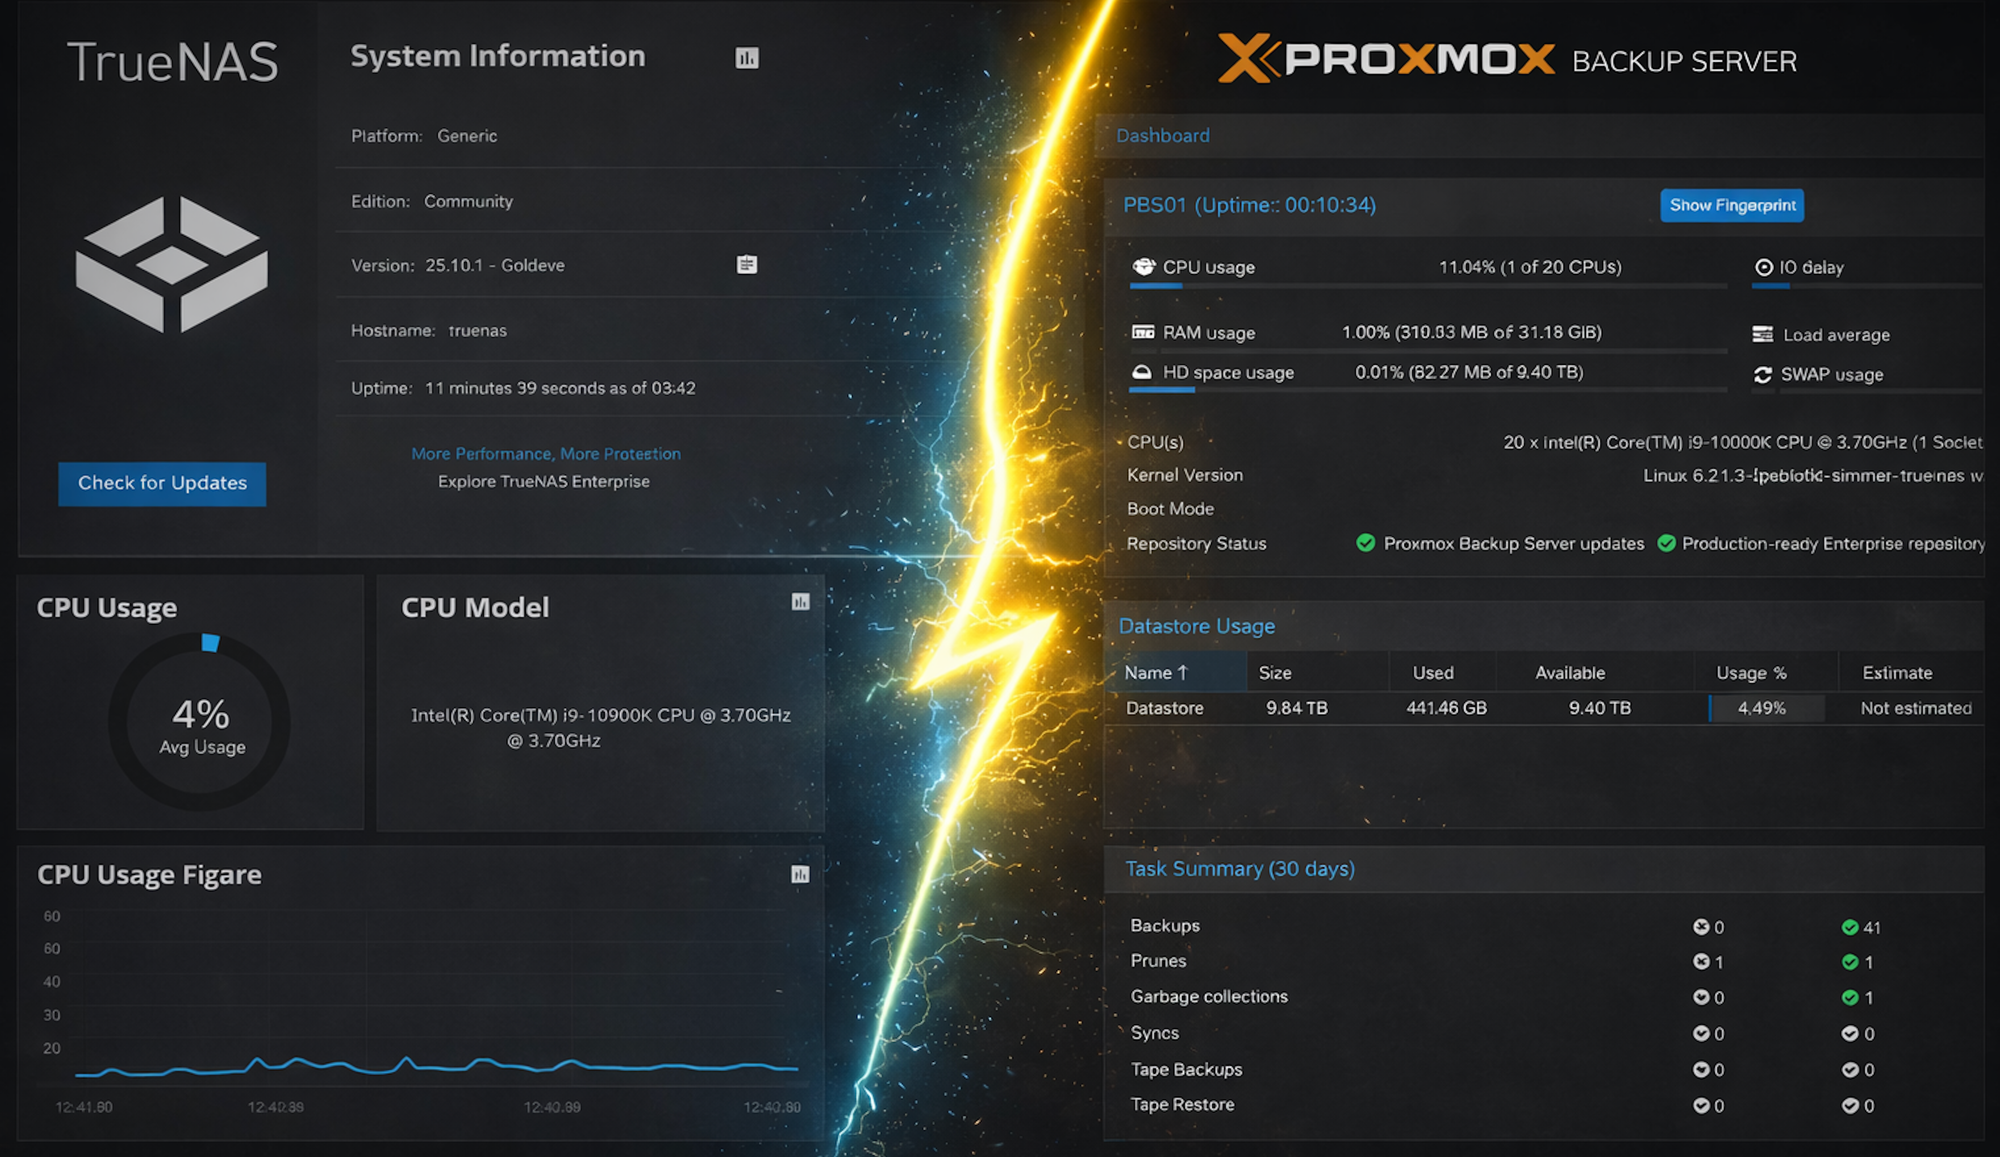
You should now see the PBS dashboard!
Next Steps: Before using PBS, you need to configure storage. See my companion blog post "Running Proxmox Backup Server in TrueNAS SCALE 25.10 Containers: The Right Way to Handle Storage" for detailed instructions on setting up a ZFS bind mount datastore (the optimal approach).
Step 7: Basic PBS Configuration
Once your datastore is configured (see companion blog post), here are some essential initial settings:
1. Configure Network (if needed):
Go to Configuration → Network/Time
- Set a static IP if desired
- Configure DNS servers
- Set timezone
2. Configure Email Notifications:
Go to Configuration → Notification
- Add an email target
- Configure SMTP settings
- Test notifications
3. Create a Backup User (optional):
Go to Configuration → Access Control → User
- Create users for backup clients
- Assign appropriate permissions
4. Configure Prune/GC Settings:
Go to Configuration → Prune & GC
- Set automatic garbage collection schedule
- Configure retention policies
Performance Optimization
CPU Limits
If you want to limit CPU usage:
# Limit to 4 CPUs
sudo incus config set PBS01 limits.cpu 4
I/O Priority
To prevent backup operations from starving other services:
# Set lower I/O priority
sudo incus exec PBS01 -- ionice -c 3 -p $(pgrep proxmox-backup)
ZFS Tuning
For optimal performance with large backup datastores:
# On TrueNAS host, for your PBS dataset
sudo zfs set recordsize=1M DATA/PBS-Backups
sudo zfs set compression=lz4 DATA/PBS-Backups
sudo zfs set atime=off DATA/PBS-Backups

You now have Proxmox Backup Server 4.x running in a lightweight Incus container on TrueNAS SCALE! This setup provides:
- Enterprise-grade backup capabilities with PBS 4.x
- Efficient storage through deduplication and compression
- Lightweight container overhead (compared to VMs)
- Direct access to TrueNAS's ZFS storage
The key advantages of this approach over traditional setups:
- No ZFS-on-ZFS overhead when using bind mounts
- Lower resource usage than running PBS in a VM
- Simplified management - everything on TrueNAS
- Cost effective - no dedicated backup hardware needed
Remember: a backup system is only as good as your last tested restore. Make sure you regularly verify your backups are working!


