
Official Somfy smart home bridges cost €150-200. This DIY solution costs about €15 and works just as well.
This guide covers the complete build: hardware, wiring, firmware, Home Assistant integration.
Hardware Required
Total cost: ~€15
- ESP32 WROOM-32 DevKit (~€5)
- CC1101 433MHz RF Module (~€3)
- 433MHz SMA Antenna (~€2)
- Dupont Jumper Wires (~€1)
The ESP32 handles WiFi and logic. The CC1101 transmits on 433MHz, the frequency Somfy uses.
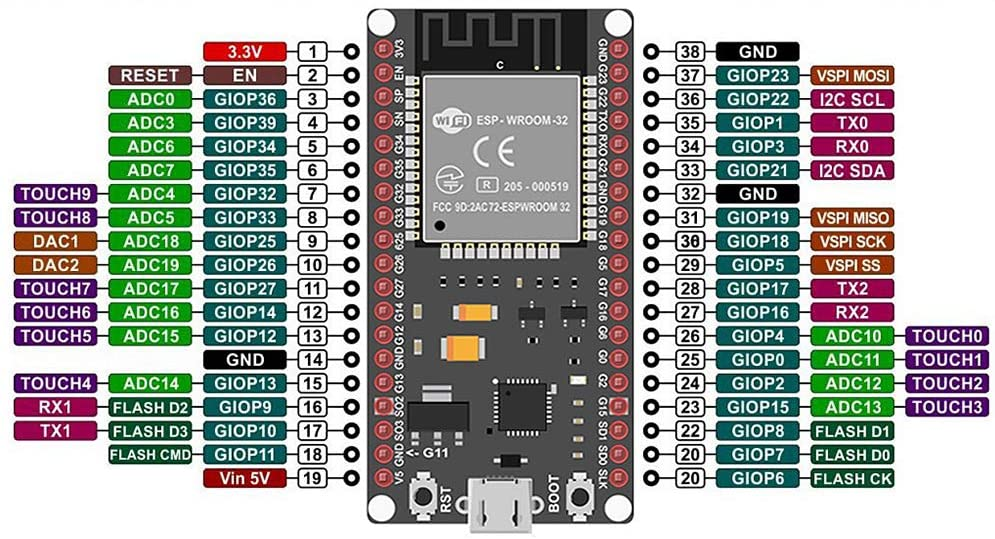
Wiring
CC1101 Pin → ESP32 GPIO
────────────────────────
VCC (Pin 1)  → 3V3
GND (Pin 2)  → GND
GDO0 (Pin 3) → GPIO 13
CSN (Pin 4)  → GPIO 5
SCK (Pin 5)  → GPIO 18
MOSI (Pin 6) → GPIO 23
MISO (Pin 7) → GPIO 19
GDO2 (Pin 8) → Not connected
Important: Use GPIO 13 for GDO0
GPIO 4 has boot behavior issues on the ESP32. I initially wired GDO0 to GPIO 4. Reception worked but transmission failed. Moving to GPIO 13 fixed it.
Antenna is Required
Without the antenna: ~1 meter range. With the antenna: 15+ meters through walls. Don't skip it.
Firmware Installation
Arduino IDE Setup
Add the ESP32 board URL in File → Preferences → Additional Board Manager URLs:
https://raw.githubusercontent.com/espressif/arduino-esp32/gh-pages/package_esp32_index.jsonCritical: Use ESP32 Core 2.0.17
ESP32 Core 3.x has breaking changes. Install version 2.0.17 specifically.
Tools → Board → Boards Manager → ESP32 → Select 2.0.17
Get the Firmware
git clone https://github.com/rstrouse/ESPSomfy-RTS.gitRequired Libraries
Install via Arduino Library Manager:
- ArduinoJson (v7.0.4)
- WebServer_ESP32_W5500 (v1.5.3)
Install manually from GitHub (download ZIP, then Sketch → Include Library → Add .ZIP):
- AsyncTCP
- ESPAsyncWebServer
Flash Settings
Board: ESP32 Dev Module
Upload Speed: 921600
Flash Size: 4MB
Partition Scheme: Default 4MB
First Boot
- Wait 30 seconds after flashing
- Connect to WiFi network "ESPSomfy-RTS"
- Open http://192.168.4.1
The web interface provides a dashboard, shutter controls, and settings.
Pairing With Shutters
Put Motor in Programming Mode
With an existing remote:
- Press and hold the PROG button (small hole on back) for 3 seconds
- Shutter will jog (quick up-down movement)
- You have 2 minutes to complete pairing
Pair the ESP32
- In ESPSomfy web interface: Shades → Add Shade
- Enter a name
- Click PROG button in interface
- Shutter jogs again to confirm pairing
Test with UP, STOP, DOWN controls.
Home Assistant Integration

MQTT Setup
Install Mosquitto broker add-on in Home Assistant:
Settings → Add-ons → Add-on Store → Mosquitto broker → Install
Configure ESPSomfy MQTT settings:
Settings → Network → MQTT:
  Enable MQTT: ✓
  Broker IP: [Your Home Assistant IP]
  Port: 1883
  Discovery Topic: homeassistant
Firewall Note
If MQTT won't connect (error -2), check that port 1883 is open for local traffic.
Auto-Discovery
Once MQTT connects, shutters appear automatically in Home Assistant. No YAML configuration needed.
Useful Automations

Morning: Open shutters at sunrise + 20 minutes
Evening: Close all shutters at sunset - 15 minutes
Heat protection: Close to 70% when outdoor temperature exceeds 28°C
Vacation mode: Random opening/closing throughout the day
Results
What works:
- 5 shutters responding reliably
- 15+ meter range through walls
- Response time under 1 second
- Stable operation over weeks
Common issues to avoid:
- Use GPIO 13 for GDO0, not GPIO 4
- Use ESP32 Core 2.0.17, not 3.x
- Install the antenna
- Open port 1883 for MQTT
In the end
For ~€15 and a few hours of work: complete control of Somfy shutters, voice control via Google Home, smart automations based on sun and temperature.
The ESPSomfy-RTS firmware is stable and actively maintained. If you have Somfy RTS shutters and basic soldering skills, this project is worth the effort.